Past Recipes
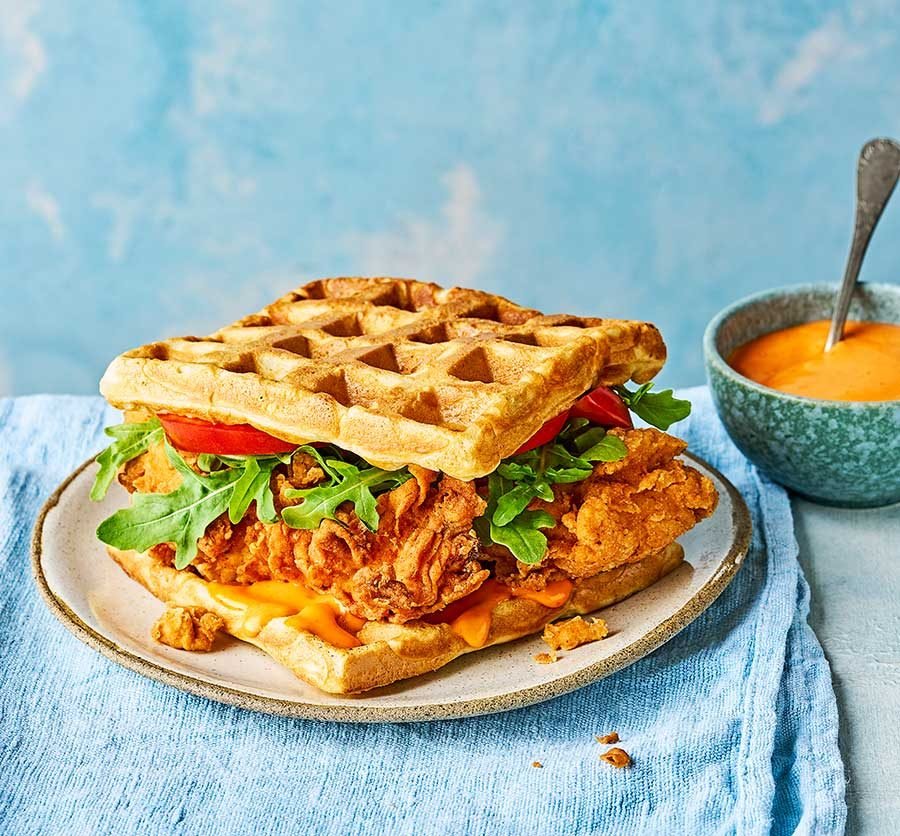
8 chicken tenders or fillets
sunflower oil for deep-frying
For the coating
320g plain flour
1 tbsp cornflour
3 tsp baking powder
2 tsp cayenne pepper
1 tbsp paprika
2 tsp garlic powder
3 eggs
- For the buttermilk
- marinade
- 300ml buttermilk
- 3 tsp chilli powder or cayenne pepper
- 2 tsp garlic powder
- For the waffle
- 320g plain flour
- 1 ¼ tsp baking powder
- 1 tsp bicarbonate of soda
- 30g light brown soft sugar
- 3 eggs
- 480ml buttermilk
- 50g unsalted butter
- melted and slightly cooled
- 4 strips pancetta
- cooked and finely chopped (optional)
Step 1: Combine all the ingredients for the buttermilk marinade, then add the chicken, and mix to coat. Cover and chill for at least 2 hrs. Will keep chilled for 24 hrs.
Step 2: Combine the ingredients for the coating, except the eggs, with 1 tsp salt. Mix well. Beat the eggs in a separate bowl. Remove the chicken tenders from the marinade, a few at a time, toss in the coating mix, then turn in the egg, and toss again in the coating mix. Arrange on a baking sheet lined with foil.
Step 3: For the waffle, combine the the flour, baking powder, bicarb and brown sugar. Add ½ tsp each salt and black pepper. Beat the eggs, then gently stir them into the dry mix. Add the buttermilk and mix until smooth, then stir in the melted butter. Mix in the pancetta, if using.
Step 4: To fry the chicken, heat a saucepan a third full with sunflower oil over a medium-high heat to 175C, or until a piece of bread dropped in browns within 30 seconds. Fry the chicken in batches until golden brown on both sides and cooked through. Transfer to a plate lined with kitchen paper as you go, setting aside to drain. If the chicken tenders are browning too fast, lower the heat.
Step 5: Cook the waffles in a waffle machine or iron for 5-6 mins until cooked and golden. Cut each waffle in half. Top the bottom halves with the garlic sauce, rocket, tomatoes and chicken tenders, then sandwich with the other half of the waffle. Serve straightaway.
チキン用
サンフラワー油(揚げ用) 適量
衣用
小麦粉 320g
コーンフラワー 大さじ1
ベーキングパウダー 小さじ3
ケイジャンペッパー 小さじ2
パプリカ 大さじ1
ガーリックパウダー 小さじ2
卵 3個
バターミルクマリネ
鶏肉テンダー(又はフィレ) 8本
バターミルク 300ml
チリパウダー 小さじ3(又はカイエンペッパー)
ガーリックパウダー 小さじ2
ワッフル用
小麦粉 320g
ベーキングパウダー 小さじ1¼
重曹 小さじ1
ブラウンシュガー 30g
卵 3個
バターミルク 480ml
無塩バター 50g(溶かして少し冷ます)
パンチェッタ 4本(オプション)
トッピング(仕上げ)
ガーリックソース(市販)
ルッコラ 適量
トマト(スライス・刻み)適量
作り方
鶏肉をマリネ バターミルク、チリパウダー、ガーリックパウダーを混ぜ、鶏肉を入れてよく絡める。ラップして 最低2時間〜24時間 冷蔵する。
衣を準備 衣用の小麦粉・コーンフラワー・ベーキングパウダー・スパイス類を混ぜる。別のボウルで卵を溶いておく。マリネしたチキンを少量ずつ衣につけ、卵→衣の順で二度付けする。
ワッフル生地を作る 小麦粉、ベーキングパウダー、重曹、ブラウンシュガーに塩コショウを少々混ぜ、卵とバターミルクを加えて滑らかになるまで混ぜる。溶かしたバター、(使う場合はパンチェッタ)を加える。
鶏肉を揚げる 鍋に油を入れ中強火で約175℃に加熱。チキンを黄金色になるまで揚げ、キッチンペーパーの上で油を切る。
ワッフルを焼く ワッフルメーカーで5〜6分、きつね色になるまで焼き、半分に切る。
サンドする ワッフルの下側にガーリックソース、ルッコラ、トマト、フライドチキンを載せ、上側のワッフルで挟む。熱いうちにどうぞ。
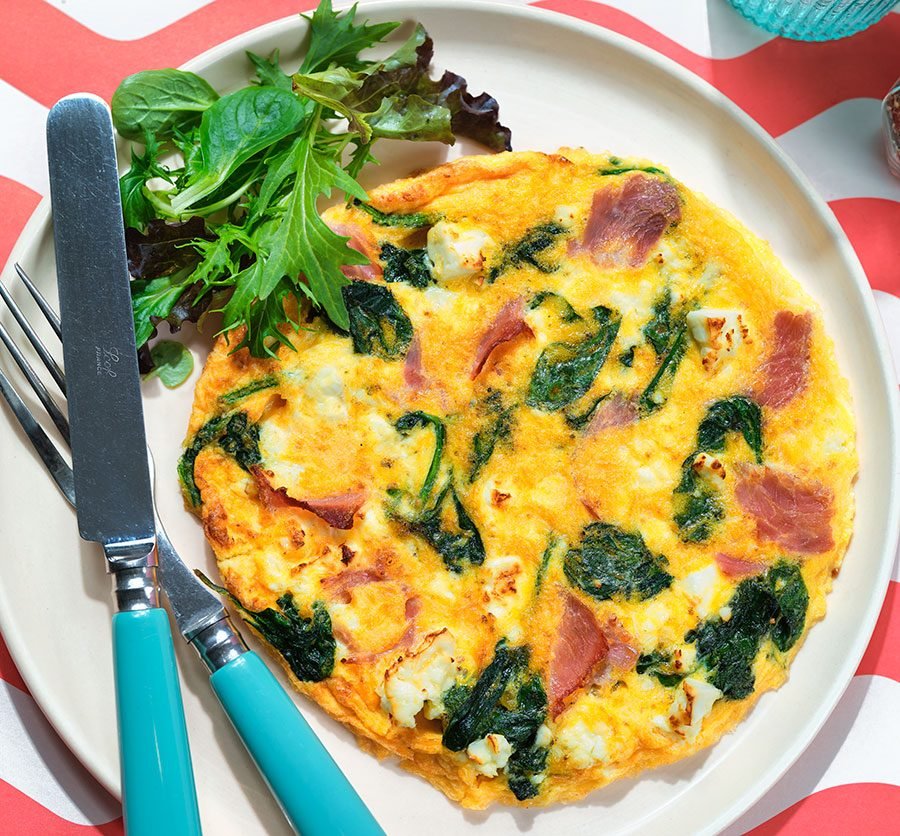
- 15g butter
- 2 eggs
- fillings of your choice, such as grated cheese, fried mushrooms, wilted spinach, crumbled feta or chopped ham
- salad to serve
Step 1
Heat the air fryer to 180C with a heatproof non-stick pan inside (a round pan will create a more traditional omelette shape). Put the butter in the pan and heat for 30 seconds more.
Step 2
Beat the eggs with a few cracks of black pepper, then mix in your chosen fillings. If using cheese, add a handful to the eggs, leaving the rest to sprinkle on at the end.
Step 3
Pour the egg mixture into the pan and cook for 8-10 mins until puffed up and golden. If you have reserved cheese, sprinkle it over the omelette. Serve with salad.
材料(1人分)
バター 15g
卵 2個
お好みの具材(例:チーズおろし、炒めたマッシュルーム、しんなりさせたほうれん草、フェタチーズ、刻んだハムなど)
サラダ(添える用)
作り方
エアフライヤーを 180℃ に予熱し、耐熱のノンスティックパンを中に入れます。丸い形のパンを使うと、伝統的なオムレツの形になります。
バターをパンに入れ、さらに30秒ほど溶かします。
卵をボウルに割り入れ、黒胡椒を少々加えてよく溶きます。
お好みの具材を混ぜ込みます。チーズを使う場合は、卵の中にひとつかみ入れ、残りは最後にトッピング用に取っておきます。
卵液をパンに流し入れ、8〜10分 ほど、ふっくらと黄金色になるまでエアフライします。
残しておいたチーズがあれば、仕上げにオムレツの上にふりかけます。サラダを添えてどうぞ。

320g sheet ready-rolled light puff pastry
6 tbsp tomato purée
1 tbsp tomato ketchup
1 tsp dried oregano
75g mozzarella or cheddar
For the topping
sweetcorn
olives
peppers
red onion
tomatoes
spinach
basil
Step 1
Heat the oven to 200C/180C fan/gas 6, or if using an air-fryer, heat it to 180C for 4 mins. Unroll the pastry, cut into six squares and arrange over two baking trays lined with baking parchment. Use a cutlery knife to score a 1cm border around the edge of each pastry square. Bake in the oven for 15 mins, until puffed up but not cooked through. Or, if using an air-fryer, bake the batch for 8 mins. You might need to do this in two batches.
Step 2
While the pastry cooks, make the sauce and prepare your toppings. Mix the tomato purée, tomato ketchup, oregano and 1 tbsp water. Grate the cheese and chop any veg or herbs you want to put on top into small pieces. Set aside.
Step 3
Remove the pastry from the oven or air-fryer and squash down the middles with the back of a spoon. Divide the sauce between the pastry squares and spread it out to the puffed-up edges. Sprinkle with the cheese, then add your toppings. Bake for another 5-8 mins in the oven or 5 mins in the air-fryer and serve.
材料
• 320g 冷凍パフペストリー(市販・軽めのもの)
• トマトピューレ 大さじ6
• トマトケチャップ 大さじ1
• 乾燥オレガノ 小さじ1
• モッツァレラチーズ 75g
またはチェダーチーズでもOK
• トッピング(お好みで)
• スイートコーン
• オリーブ
• ピーマン
• 赤玉ねぎ
• ミニトマト
• ほうれん草
• バジル など
作り方
1. オーブンを予熱
オーブンを200℃(ファン180℃、ガス6)に予熱します。
※エアフライヤーなら180℃で約4分温めます。 
2. パフペストリーを準備
パフペストリーを広げ、6等分に切ります。
クッキングシートを敷いた天板に並べ、縁から1cmくらいのところに包丁で浅く切り込みを入れて囲いを作ります。
→ 15分ほど焼いて、ふくらませます(完全に焼き切らない)。
※エアフライヤーなら1回分を約8分加熱します。 
3. ソースとトッピングを準備
トマトピューレ、トマトケチャップ、オレガノ、水 大さじ1を混ぜてピザソースを作ります。
チーズをすりおろし、お好みの野菜やハーブを細かく切っておきます。 
4. トッピングをのせて焼く
一度焼いたパイ生地を取り出し、スプーンの裏で中央を軽く押してへこませます。
→ ソースを塗り、チーズを散らし、続いてお好みのトッピングをのせます。
→ 再度オーブンで5〜8分(エアフライヤーなら約5分)焼いて完成です。
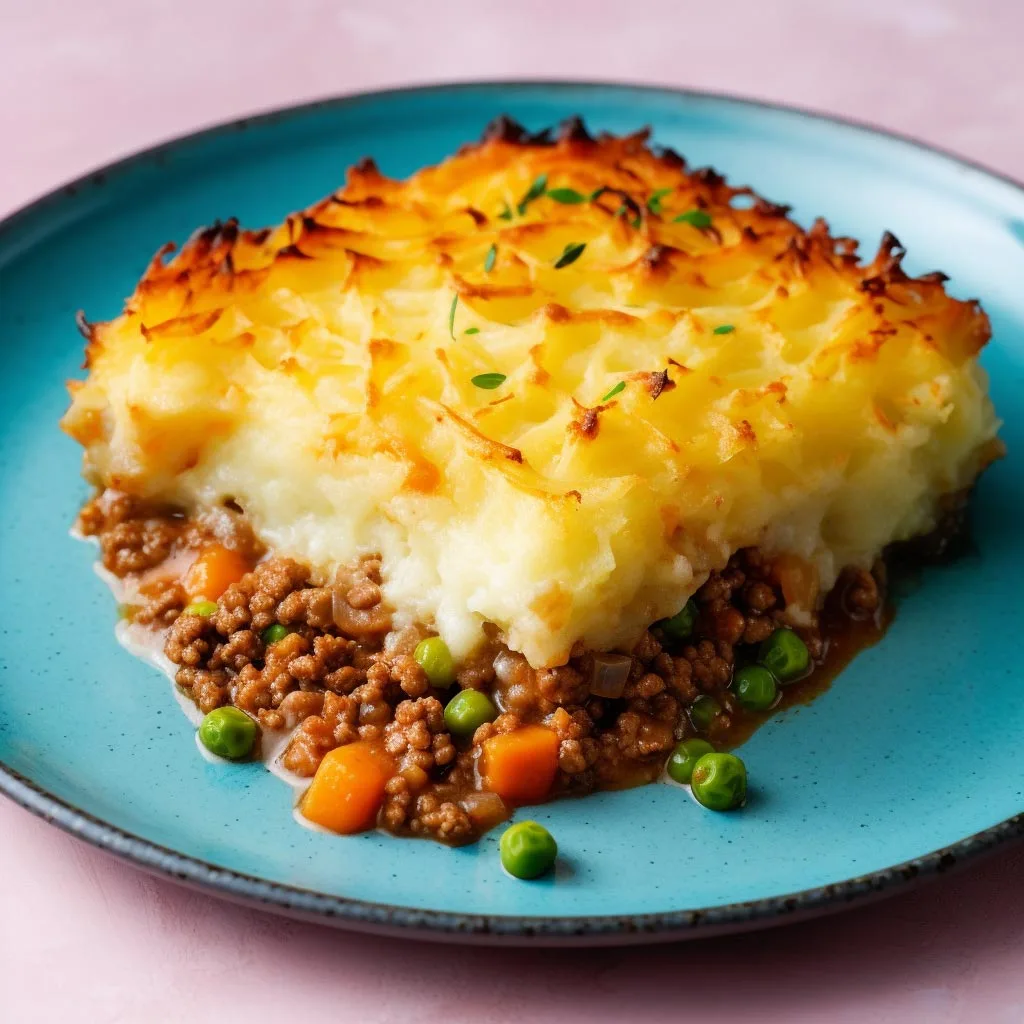
- 3 tbsp olive oil
- 1¼kg beef mince
- 2 onions finely chopped
- 3 carrots chopped
- 3 celery sticks chopped
- 2 garlic cloves finely chopped
- 3 tbsp plain flour
- 1 tbsp tomato purée
- large glass of red wine (optional)
- 850ml beef stock
- 4 tbsp Worcestershire sauce
- a few thyme sprigs
- 2 bay leaves
- For the mash
- 1.8kg potatoes chopped
- 225ml milk
- 25g butter
- 200g strong cheddar grated
- freshly grated nutmeg
step 1: Heat 1 tbsp olive oil in a large saucepan and fry 1¼kg beef mince until browned – you may need to do this in batches. Set aside as it browns.
step 2: Put the other 2 tbsp olive oil into the pan, add 2 finely chopped onions, 3 chopped carrots and 3 chopped celery sticks and cook on a gentle heat until soft, about 20 mins.
step 3: Add 2 finely chopped garlic cloves, 3 tbsp plain flour and 1 tbsp tomato purée, increase the heat and cook for a few mins, then return the beef to the pan.
step 4: Pour over a large glass of red wine, if using, and boil to reduce it slightly before adding the 850ml beef stock, 4 tbsp Worcestershire sauce, a few thyme sprigs and 2 bay leaves.
step 5: Bring to a simmer and cook, uncovered, for 45 mins. By this time the gravy should be thick and coating the meat. Check after about 30 mins – if a lot of liquid remains, increase the heat slightly to reduce the gravy a little. Season well, then discard the bay leaves and thyme stalks.
step 6: Meanwhile, make the mash. In a large saucepan, cover the 1.8kg potatoes which you’ve peeled and chopped, in salted cold water, bring to the boil and simmer until tender.
step 7: Drain well, then allow to steam-dry for a few mins. Mash well with the 225ml milk, 25g butter, and three-quarters of the 200g strong cheddar cheese, then season with freshly grated nutmeg and some salt and pepper.
step 8: Spoon the meat into 2 ovenproof dishes. Pipe or spoon on the mash to cover. Sprinkle on the remaining cheese.
step 9: Heat oven to 220C and cook for 25-30 mins, or until the topping is golden.
ミートフィリング
オリーブオイル 大さじ1
玉ねぎ(みじん切り)1個
にんじん(みじん切り)2本
セロリ(みじん切り)2本
にんにく(みじん切り)2片
牛ひき肉 500g
トマトピューレ 大さじ2
小麦粉 大さじ1
ビーフストック 500ml
ウスターソース 大さじ1
フレッシュタイム(または乾燥)少々
ローリエ 1枚
マッシュポテト
じゃがいも 900g
バター 85g
牛乳 85ml
作り方
① ミートフィリングを作る
フライパンにオリーブオイルを入れて中火で熱する
玉ねぎ・にんじん・セロリを入れ、約10分じっくり炒める
にんにくを加えてさらに1分炒める
② 牛ひき肉を加える
牛ひき肉を入れ、色が変わるまでしっかり炒める
トマトピューレと小麦粉を加えて混ぜる
③ 煮込む
ビーフストック、ウスターソース、タイム、ローリエを加える
弱めの中火で 30〜40分 煮込む(とろみがつくまで)
④ マッシュポテトを作る
じゃがいもを塩水で柔らかくなるまで茹でる
水を切って潰し、バターと牛乳を加えてなめらかにする
⑤ 焼く
オーブンを 200℃ に予熱
耐熱皿にミートフィリングを入れ、上にマッシュポテトをのせる
フォークで表面に模様をつける
20〜25分、表面がこんがりするまで焼く
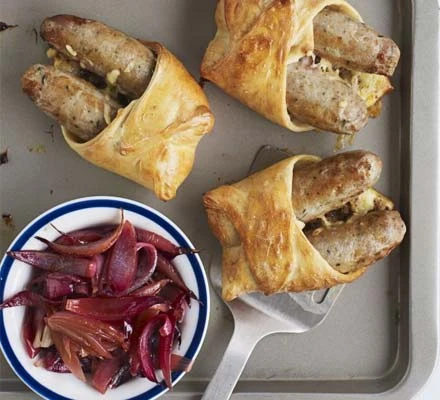
- 140g plain flour
- 2 tsp mustard powder (optional)
- 4 eggs
- 200ml milk
- 8 rashers smoked streaky bacon
- 8 plump sausages (we used pork & apple, but you can use your favourite variety)
- 2 tbsp sunflower oil
- gravy
- steamed green veg, to serve
Step 1
Tip the flour and mustard powder, if using, into a bowl, and beat in the eggs until smooth. Whisk in the milk, a little at a time, until all of it has been incorporated and the batter is lump-free. Season and set aside. Wrap a bacon rasher around each sausage. The batter and the pigs in blankets will keep covered and chilled, separately, for up to 12 hrs.Step 2
Heat the oven to 220C/200C fan/gas 7. Drizzle the oil into a large, deep roasting tin or enamel baking dish, and put in the oven for a few minutes to heat up. Carefully add the pigs in blankets and tip back and forth to coat in the hot oil. Roast for 15-20 mins, turning over halfway through, until sizzling and browned.Step 3
Carefully remove the tin from the oven and, working quickly, pour the batter around the pigs in blankets. Return to the oven and bake for 25 mins without opening the oven door. When the toad in the hole is ready, it should be puffed up and deep golden brown. If you prefer it darker brown, bake for 5 mins more. Serve with gravy and green veg.
材料
小麦粉(プレーンフラワー) … 140 g
マスタードパウダー(お好みで) … 小さじ2
卵 … 4個
牛乳 … 200 ml
ベーコン(スモーク、細長いスライス) … 8枚
太めのソーセージ … 8本(例:ポーク&アップルなど)
サンフラワー油 … 大さじ2
グレイビーソース … 適量
茹で野菜(添え物) … お好みで
※ソーセージやベーコンはお好きな種類でOKです
大きめのボウルに 140 g の小麦粉 と マスタードパウダー(任意) を入れます。
中央をくぼませて 卵 4 個 を割り入れます。
泡立て器で混ぜながら、少しずつ 牛乳 200 ml を加えて、ダマがなくなるまでよく混ぜます。
塩・胡椒で軽く味付けし、横に置きます。
オーブンを 220 ℃(ファン / ガス 7 相当) に予熱します。
深めのロースト用トレー(耐熱皿)に 油 大さじ2 を入れてオーブンで温めます。
ベーコンを 1 枚ずつソーセージに巻きつけます。
熱くなったトレーにベーコン巻きソーセージを並べ、15〜20 分ほど カリッとして脂が出るまで焼きます(途中で転がすと均等に焼けます)。
ソーセージを焼いたトレーをオーブンから注意して取り出します(油がとても熱いので注意!)。
焼いたソーセージの周りに バッター生地 をゆっくり注ぎ入れます。
すぐにオーブンに戻し、 25 分ほど焼きます(途中でオーブンを開けないでね)。
生地が膨らみ、黄金色になったら完成です!
※もっと濃い色が好きなら、あと 5 分焼き増してください。
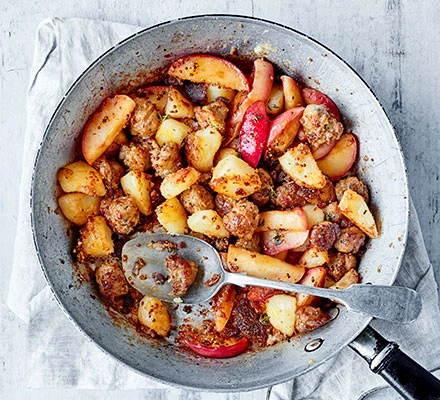
- 450g white potatoes peeled and cut into 2cm cubes
- 30g butter
- olive oil for frying
- 2 small Cox’s apples cored and cut into wedges
- 4 herby pork sausages cut into chunks
- 2 tsp wholegrain mustard
- 3 thyme sprigs leaves picked
- watercress salad to serve
step 1
Bring a large pan of salted water to the boil. Add the potatoes and cook for 4 mins. Drain and leave to steam dry in a colander.
step 2
Heat half the butter and 1 tbsp olive oil in a large frying pan or shallow casserole dish over a medium-high heat. Add the apple wedges and fry on each side for 5 mins or until golden brown and starting to caramelise. Remove with a slotted spoon and set aside on a plate.
step 3
In the same pan, heat the remaining butter and a little more oil over a medium heat and add the potatoes and sausage chunks. Fry for 10-15 mins, turning every so often until the potatoes and sausage are crisp and golden brown. Season to taste. Stir through the mustard and the apple wedges, then scatter over some thyme leaves, and serve with watercress salad.
材料(2人分)
• 白ジャガイモ 450g(皮をむき、2cm角に切る) 
• バター 30g 
• オリーブオイル(炒め用) 
• 小さめのリンゴ(例:コックス種)2個 — 芯を取り、くし切りにする 
• ハーブ入り豚ソーセージ 4本 — 一口大に切る 
• 粒マスタード(wholegrain mustard) 大さじ2杯(2 小さじ) 
• タイムの小枝 3本分(葉を摘む) 
• サービス用に:ウォータークレス(またはお好みのサラダ菜) 
作り方
1. 大きな鍋にたっぷりの塩水を沸かし、ジャガイモを入れ、約4分茹でる。ザルにあげ、水分を切って蒸気を飛ばす。 
2. フライパン(または浅めのキャセロール鍋)にバターの半量とオリーブオイル大さじ1を熱し、中火〜強火でリンゴのくし切りを入れる。両面を約5分ずつ焼いて、きつね色になりカラメル状になり始めたら、スロット付きスプーンで取り出し、皿に出しておく。 
3. 同じフライパンに残りのバターとオリーブオイル少量を加え、中火でジャガイモとソーセージの一口大に切ったものを入れて炒める。約10〜15分、時々返しながら炒め、ジャガイモとソーセージがサクッと黄金色になるまで焼く。塩コショウで味付け。 
4. 火を止め、粒マスタードと炒めたリンゴを加え、タイムの葉を散らす。
5. お好みでウォータークレスなどのサラダを添えてサーブする。 
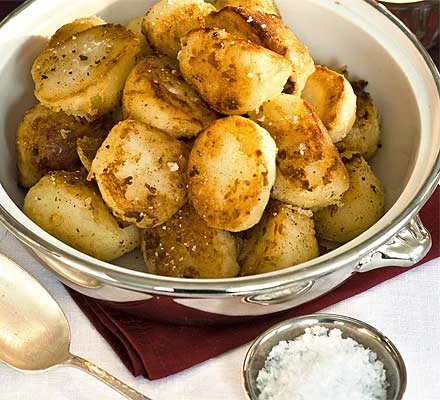
- 2 ½kg Desirée or King Edward potato
- 2 tbsp flour
- 5 tbsp goose fator sunflower oil
step 1
Peel the potatoes, then cut into halves, or quarters if large. Bring a large pan of water to the boil, add a little salt, then tip the potatoes into the pan. Bring back to the boil and cook for 7 mins. Drain really well, then return to the pan and sprinkle over the flour. Place a lid on top of the pan, then pick up the pan using oven gloves or a tea towel and give it a few really hard shakes so the potatoes get bashed around (this will make them nice and crisp).
step 2
Heat oven to 190C/fan 170C/gas 5. Spoon the goose fat or sunflower oil onto a large, lipped baking tray and leave to heat on the top shelf of the oven for 5 mins. Carefully pull out the tray, make sure its surface is evenly coated with the fat, then tip on the potatoes. Roast for 20 mins, then turn up the oven to 220C/fan 200C/gas 7 and roast for another 30 mins, turning the potatoes once, until golden and crisp. Sprinkle with a little salt and serve straight away.
材料
• じゃがいも(できれば「Desirée」または「King Edward」など) — 約 2½ kg 
• 薄力粉 — 大さじ 2 
• グースファット(またはひまわり油) — 大さじ 5 
作り方
1. じゃがいもの皮をむき、大きければ半分か四分の一に切る。
大きな鍋に湯を沸かし、塩を少し入れてからじゃがいもを加える。再び沸騰したら、7 分間下茹でする。 
2. 茹でたじゃがいもをよく水気を切り、鍋に戻して粉(薄力粉)をまぶす。
鍋に蓋をし、オーブン用のミトンやタオルを使って鍋を持ち、数回勢いよく振ってじゃがいもを“叩く”ようにする — こうすることで表面がザラッとなり、焼き上がりがカリッとする。 
3. オーブンを 190°C(ファン付きなら170°C/ガス5) に予熱。大きめの縁付きベーキングトレイにグースファット(またはひまわり油)を入れ、上段に入れて 5 分間温める。 
4. オーブンからトレイを取り出し、脂が全体に広がっていることを確認したら、粉をまぶしたじゃがいもを入れる。均一になるよう広げる。
まず 20 分ロースト → その後オーブン温度を 220°C(ファン200°C/ガス7) に上げ、さらに 30 分ロースト。途中一度じゃがいもを返す。表面がきつね色でカリッとするまで。 
5. 焼きあがったら、軽く塩を振ってすぐにサーブ。
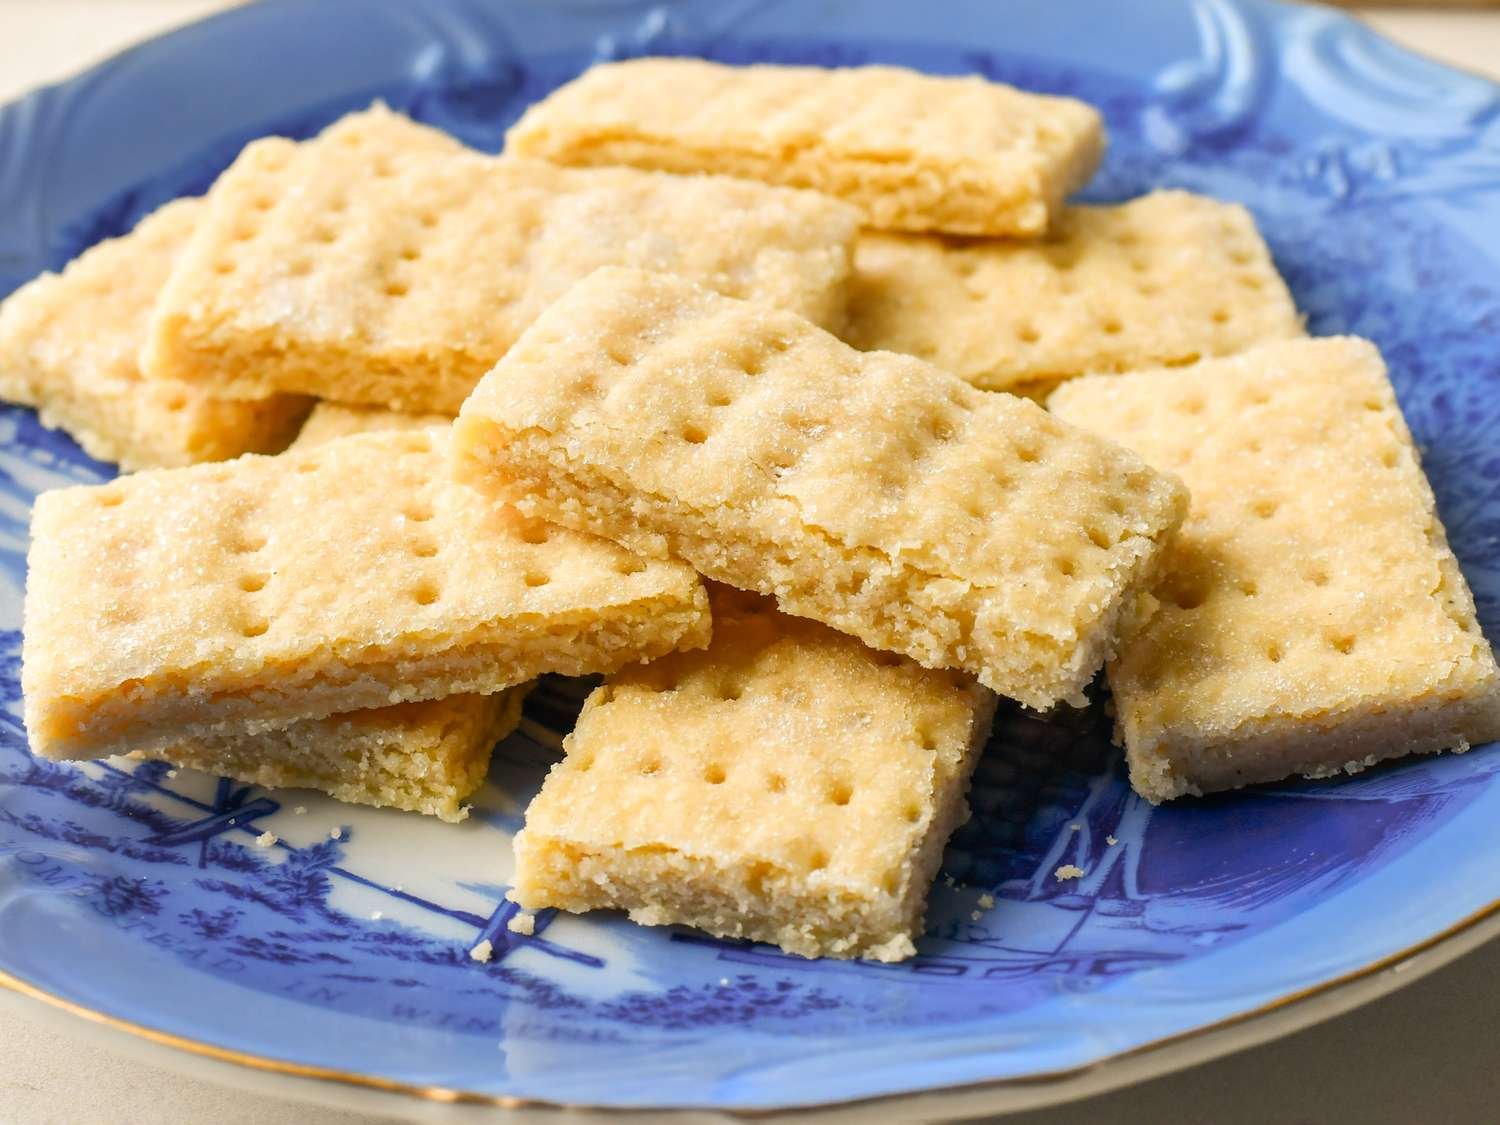
- 150g/5oz plain flour plus extra for dusting
- 100g/4oz butter chilled and cubed
- 50g/2oz caster sugar plus 1 tbsp for sprinkling
step 1
Heat the oven 170C/150C fan/gas 3. Put the flour, butter and sugar into a mixing bowl.
Hand pouring butter, sugar and flour into a glass bowlstep 2
Use your hands to combine the ingredients until the mixture looks like breadcrumbs, then squeeze until it comes together as a dough.
Hands rubbing butter in a bowlstep 3
On a lightly floured surface, use a rolling pin to roll out the dough to ½ cm thick.
step 4
Cut the dough into fingers and place on a lined baking tray. Use a fork to create imprints.
Fork imprinting shortbread biscuitsstep 5
Then sprinkle with the remaining caster sugar.
Biscuits being sprinkled with sugarstep 6
Chill the dough in the fridge for 20 mins, then bake for 15-20 mins until golden brown. Remove the shortbread fingers from the oven and leave to cool on the tray for 10 mins.
🧾 材料
• 薄力粉(プレーンフラワー) 150g(打ち粉用に少量も用意)
• バター(冷やして角切り) 100g
• グラニュー糖 50g
• 仕上げ用グラニュー糖(トッピング) 大さじ1
栄養素(1枚あたり):約79kcal、脂質4g、炭水化物9g など。 
⸻
🍪 作り方
1. 予熱
オーブンを170℃(ファン150℃)/ガス3に予熱します。 
2. 材料を混ぜる
ボウルに小麦粉、バター、砂糖を入れます。手でよく混ぜ、粗いパン粉状 → 生地がまとまるまで揉み込みます。 
3. 生地をのばす
打ち粉をした作業台で棒状に伸ばし、厚さ約0.5cmにします。 
4. カット
ナイフで指状に切り、天板に並べます。フォークで表面に軽く模様をつけます。 
5. 砂糖をふる
上から残りの砂糖を振りかけます。 
6. 焼く
冷蔵庫で20分間冷やしてから(生地が広がりにくくなります)、オーブンで15〜20分ほど、薄くきつね色になるまで焼きます。 
7. 冷ます
焼き上がったら天板のまま10分ほど冷まし、その後ワイヤーラックなどで完全に冷まします。 
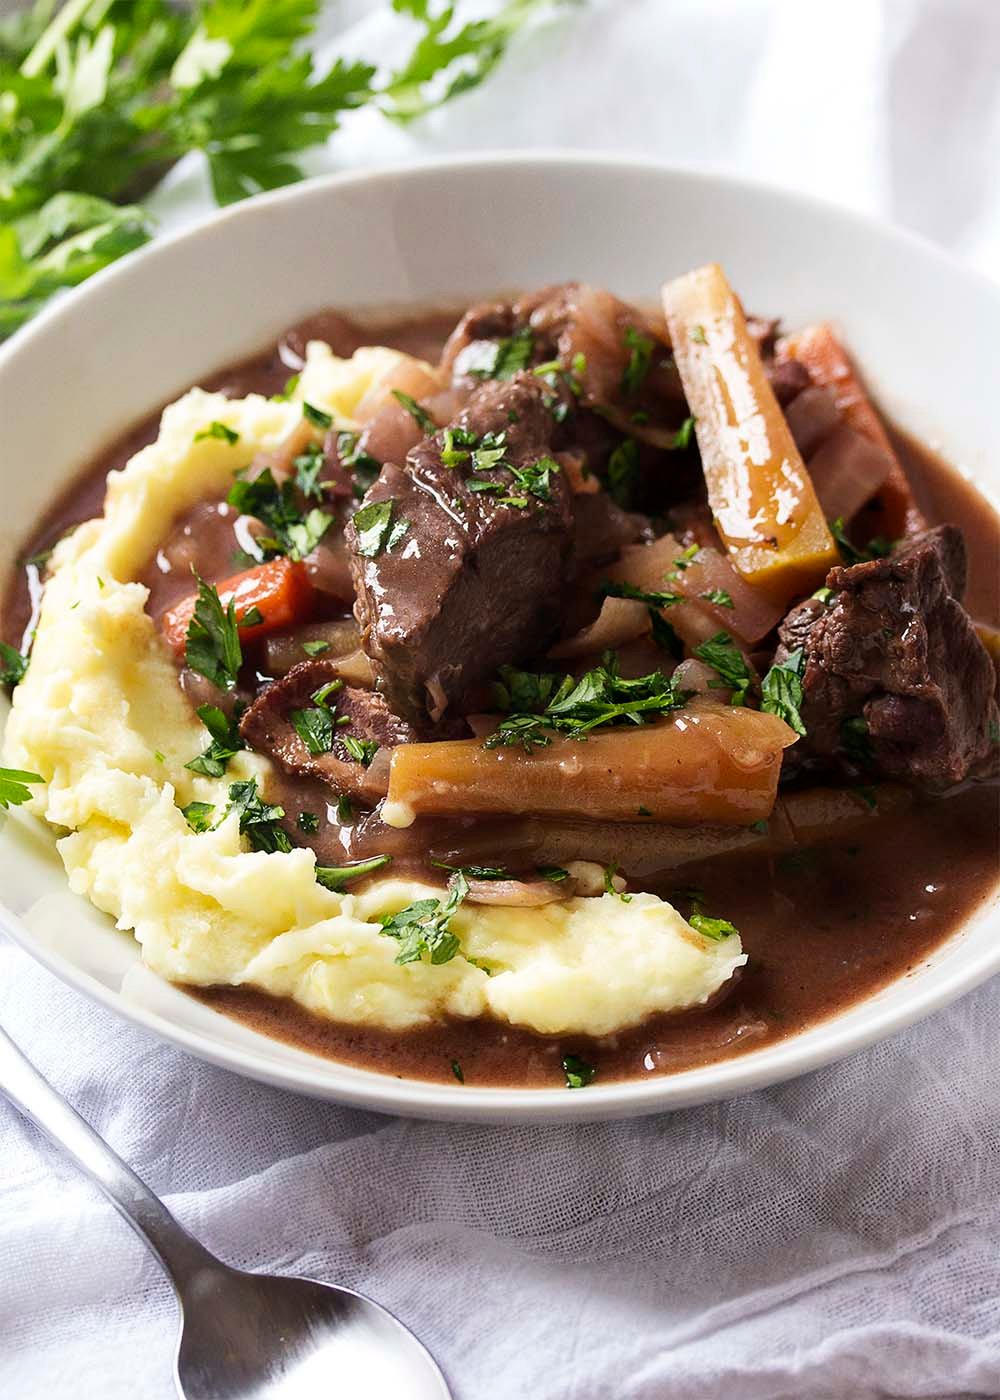
- 1 onion chopped
- 2 celery sticks finely chopped
- 2 tbsp rapeseed oil
- 3 carrots halved and cut into chunks
- 2 bay leaves
- ½ pack thyme
- 2 tbsp tomato purée
- 2 tbsp Worcestershire sauce
- 2 beef stock cubes or stock pots
- 900g beef for braising such as skirt, buy a whole piece and cut it yourself for bigger chunks or buy ready diced
- 2 tsp cornflour (optional)
- ½ small bunch parsley chopped
- buttery mash to serve (optional)
step 1
Fry the onion and celery in 1 tbsp oil over a low heat until they start to soften – about 5 mins. Add the carrots, bay and thyme, fry for 2 mins, stir in the purée and Worcestershire sauce, add 600ml boiling water, stir and tip everything into a slow cooker. Crumble over the stock cubes or add the stock pots and stir, then season with pepper (don’t add salt as the stock may be salty).
step 2
Clean out the frying pan and fry the beef in the remaining oil in batches until it is well browned, then tip each batch into the slow cooker. Cook on low for 8-10 hrs, or on high for 4 hrs.
step 3
If you want to thicken the gravy, mix the cornflour with a splash of cold water to make a paste, then stir in 2 tbsp of the liquid from the slow cooker. Tip back into the slow cooker, stir and cook for a further 30 mins on high. Stir in the parsley and season again to taste. Serve with mash, if you like. Leave to cool before freezing.
材料
• 玉ねぎ 1個(みじん切り)
• セロリ 2本(細かくみじん切り)
• 菜種油 大さじ2
• にんじん 3本(半分に切って、角切り)
• ローリエ 2枚
• タイム 1/2パック
• トマトペースト 大さじ2
• ウスターソース 大さじ2
• ビーフストックキューブ(またはストックポット)2個
• 煮込み用牛肉 900g(大きめの一塊を買って自分で切るか、角切りを購入)
• コーンフラワー 小さじ2(お好みで)
• パセリ(小束)1/2(みじん切り)
• マッシュポテト(お好みで)
作り方
玉ねぎとセロリを、大さじ1の油で弱火で約5分炒め、少し柔らかくします。
次に、にんじん・ローリエ・タイムを加えて2分炒めます。
トマトペーストとウスターソースを入れて混ぜ、沸騰したお湯600mlを加えてよく混ぜ、スロークッカーに移します。
ストックキューブ(またはストックポット)を崩し入れて混ぜ、こしょうで味つけします。
(塩はストックがしょっぱい可能性があるので入れません。)
フライパンを一度きれいにして、残りの油で牛肉を少量ずつよく焼き色がつくまで炒めます。
焼けたらその都度スロークッカーに入れます。
弱(low)で8~10時間、または強(high)で4時間調理します。
とろみをつけたい場合、コーンフラワーに少量の冷水を混ぜてペーストにします。 スロークッカーの煮汁を大さじ2加えて混ぜ、それを鍋に戻して混ぜます。 強(high)でさらに30分調理します。 最後にパセリを加えて味を整えます。 お好みでマッシュポテトと一緒にどうぞ。 冷ましてから冷凍もできます。

- 1 tbsp vegetable oil
- 1 onion finely chopped
- 2 garlic cloves crushed
- 1 potato (about 150g) finely diced
- 1 carrot (about 100g) finely diced
- 100g frozen peas
- 2 tsp curry powder or your own spices according to taste
- 100ml vegetable stock
For the pastry
- 225g plain flour
- 2 tsp sea salt
- 2 tbsp vegetable oil
- 2l vegetable oil to deep fry
step 1: To make the filling, heat the oil in a frying pan, add the onion and garlic, mix in the spices and fry for 10 mins until soft. Add the vegetables, seasoning and stir well until coated. Add the stock, cover and simmer for 30 mins until cooked. Leave to cool.
step 2: To make the pastry, mix flour and salt into a bowl. Make a well in the centre, add the oil and 100ml water to make a firm dough. Knead the dough on a floured surface for 5-10 mins until smooth and roll into a ball. Cover in cling film and set aside at room temperature for 30 mins.
step 3: Divide the pastry into 12 equal pieces. Roll each piece into a ball and roll out into a circle of 15cm. Divide this circle into two equal pieces with a knife.
step 4: Brush each edge with a little water and form a cone shape around your fingers, sealing the dampened edge. Fill with 1 tbsp mixture and press the two dampened edges together to seal the top of the cone. Repeat with the remaining pastry.
step 5: Heat the oil in a large deep saucepan to 180C. The oil should come 1/3rd of the way up the pan. Deep fry the samosas in batches for 8-10 mins until crisp and brown. Take out and drain on kitchen paper.
材料 野菜油 大さじ1
玉ねぎ1個(みじん切り)
にんにく2片(つぶす)
じゃがいも150 g程度(細かく角切り)
人参100 g程度(細かく角切り)
冷凍グリーンピース100 g
カレーパウダー小さじ2(またはお好みのスパイス)
野菜ストック100 ml
生地用 :
薄力粉225 g
海塩小さじ2
野菜油大さじ2
揚げ油(深めの鍋用)2リットル
作り方
ステップ1: フライパンに油を熱し、玉ねぎとにんにくを加えて、スパイスを混ぜ炒める。約10分間、柔らかくなるまで炒める。じゃがいも・人参・グリーンピースを加え、味を調えて良く混ぜる。野菜ストックを注ぎ、蓋をして約30分間煮る。野菜が煮えたら冷ましておく。
ステップ2: 生地を作る。ボウルに薄力粉と塩を入れて混ぜ、中央にくぼみを作る。油と100 mlの水を加えて、しっかりとした生地を作る。打ち粉した台の上で5~10分間こねて滑らかにする。ラップで覆って室温で30分休ませる。
ステップ3: 生地を12等分にし、それぞれボール状に丸める。各ボールを直径約15 cmの円形に伸ばす。ナイフで円を半分に切り、2 等分する(計24枚の半円形になる)。
ステップ: 各半円形の真っ直ぐな辺に少し水を塗り、指の周りに円錐形(コーン)に成形して、水を塗った部分を閉じる。冷ました野菜ミックスを大さじ約1入れ、上部の辺を重ねてしっかり封をする。残りの生地・具材でも同様に繰り返す。
ステップ5: 大きな深鍋に油を入れ180 °Cに熱する。油の量は鍋の1/3程度まで入れる。サモサを数個ずつ揚げ、約8~10分間、カリッと黄金色になるまで揚げる。取り出してキッチンペーパーなどで油を切る。

- 400g linguine or spaghetti
- 1 small Savoy cabbage cut into 1cm-wide slices
- 4 tbsp olive oil
- 5 garlic cloves, thickly sliced
- 50g can of anchovies in olive oil
- large pinch crushed chilli flakes
For the crispy crumbs
- 1-2 tbsp olive oil
- 50g fresh white breadcrumbs
- 4 tbsp finely chopped parsley
- 2 tbsp freshly grated pecorino or Parmesan
step 1
Cook the linguine in a large pan of boiling, salted water following pack instructions, adding the cabbage for the final 4 mins of cooking time.
step 2
Meanwhile, heat the oil in a very small saucepan and gently cook the garlic. As soon as it starts to turn golden, lift out with a fork and set aside – it’s very important that the garlic does not brown or it will spoil the flavour of the oil.
step 3
Add the anchovies and their oil, and cook for 1-2 mins, mashing with a fork. Add about 150ml of hot water (take a ladle or two from the pasta pan) and simmer very gently until the pasta is ready.
step 4
To make the crumbs, heat the oil in a large pan and cook the bread and parsley, stirring frequently, for 5 mins until crisp and golden. Mix in the cheese.
step 5
Drain the pasta quite lightly and return to the pan. Add the anchovy sauce, garlic, chilli and plenty of black pepper. Toss well to combine, then divide between bowls, scatter with the hot crumbs and serve.
材料 (4人分)
• 400 g linguine(またはスパゲッティ)
• 小さめのセイボイキャベツ 1個、1 cm 幅のスライスにする
• オリーブオイル 4 大さじ
• にんにく 5片、厚めにスライス
• アンチョビ缶 50 g(オリーブオイル漬け)
• 粗く砕いたチリフレーク 大きめひとつまみ
クリスピーなパン粉用
• オリーブオイル 1〜2 大さじ
• 生パン粉 50 g
• パセリ(みじん切り)4 大さじ
• ペコリーノまたはパルメザンチーズ(すりおろし)2 大さじ
作り方
1. 大きな鍋に塩を加えた沸騰したお湯を用意し、パッケージの指示に従ってパスタを茹で始めます。茹でている最後の4分間でキャベツを加えます。
2. その間に、小さな鍋でオリーブオイルを温め、にんにくをそっと加えて調理します。にんにくが黄金色になり始めたらすぐにフォークで取り出し、別皿に取っておきます。にんにくが茶色く焦げないようにするのが重要です。
3. アンチョビとそのオイルを加え、1〜2分ほどフォークで潰しながら調理します。鍋からお玉1〜2杯分の熱湯(約150 ml)を加え、パスタが茹で上がるまで優しく煮ます。
4. パン粉用に、別の大きめのフライパンでオリーブオイルを温め、生パン粉とパセリを加え、5分ほど、頻繁に混ぜながらカリッと黄金色になるまで炒めます。最後にチーズを混ぜ入れます。
5. 茹で上がったパスタを軽く湯切りして鍋に戻します。アンチョビソース、にんにく、チリフレーク、たっぷりの黒こしょうを加えてよく和え、器に分け入れて、最後に熱々のパン粉を散らしてサーブします。
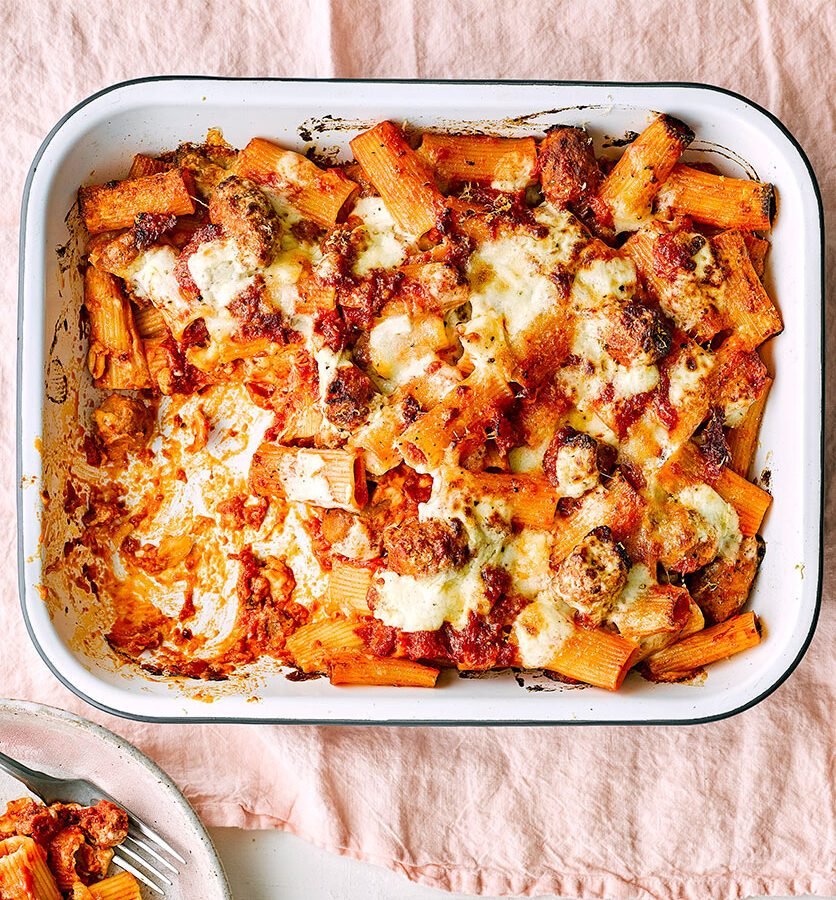
- 400g rigatoni or penne
- 125g ball mozzarella, chopped into chunks
For the ragu
- 2 tbsp olive oil
- 6 pork sausages
- 4 garlic cloves sliced
- pinch of chilli flakes (optional)
- 1 tbsp tomato purée
- 1 tbsp red wine vinegar
- 2 x 400g cans chopped tomatoes
For the white sauce
- 1 tbsp butter
- 1 tbsp plain flour
- 350ml milk
- 50g parmesan
- grated, plus extra to serve
step 1
To make the ragu, heat the oil in a large shallow pan or flameproof casserole. Squeeze the sausagemeat from its skins in small balls straight into the pan. Sizzle for 10 mins until browned (don’t worry if the meat breaks up). Add the garlic and sizzle for another minute until starting to turn golden, then stir in the chilli flakes, if using, the tomato purée and vinegar. Tip in the tomatoes and bring to a simmer. Reduce the heat to low and bubble for 30 mins.
step 2
Meanwhile, make the white sauce. Melt the butter in a saucepan and stir in the flour to make a loose paste. Sizzle for a minute, then gradually whisk in the milk. Simmer gently for 10 mins, whisking occasionally to ensure the sauce stays smooth. Season and whisk in the parmesan. Remove from the heat and set aside.
step 3
Cook the pasta in a large saucepan of boiling water for 9 mins, or a minute less than pack instructions. Drain and return to the pan. Scrape most of the white sauce into the pasta and stir to coat. Tip in most of the ragu and most of the mozzarella and stir until just combined. Pour the pasta mixture into a large baking dish and spoon over the remaining white sauce and ragu. Dot with the rest of the mozzarella and sprinkle with extra parmesan. Leave to cool completely, then wrap and chill for up to a day, or freeze for up to two months. Defrost in the fridge for 24 hrs before baking.
step 4
Heat the oven to 190C/170C fan/gas 5. Bake for 25-30 mins until the top is slightly crisp at the edges and the cheese is melted. Leave to rest for 5-10 mins, then take the baking dish straight to the table for people to scoop onto their plates.
材料
- リガトーニ 400 g または ペンネ
- モッツァレラチーズ(ボール)125 g、塊に切る
ラグー用
オリーブオイル 大さじ2
豚ソーセージ 6本
ニンニク 4片、スライス
チリフレーク 少々(お好みで)
トマトピューレ 大さじ1
赤ワインビネガー 大さじ1
カットトマト缶 400 g×2
ホワイトソース用
バター 大さじ1
薄力粉 大さじ1
牛乳 350 ml
パルメザンチーズ 50 g(すりおろし)、仕上げ用に少々追加
作り方
- Ragu を作る:大きめの浅い鍋または耐火キャセロールにオイルを熱します。ソーセージの皮を外して小さな団子状に直接鍋に入れ、10分間炒めてきつね色になるまで。肉が崩れても気にせず。ニンニクを加えてさらに1分程炒め、色が出てきたら(お好みで)チリフレーク、トマトピューレ、ビネガーを加える。トマト缶を注ぎ、煮立たせる。火を弱めて30分程コトコト煮る。
- 同時にホワイトソースを作ります。鍋にバターを溶かし、薄力粉を加えて緩めのペースト状にします。1分ほど炒めてから、少しずつ牛乳を泡立て器で混ぜ入れます。時々混ぜながら弱火で10分程ゆっくり煮て、ソースが滑らかになるようにします。塩・コショウで調味し、すりおろしたパルメザンを加えて混ぜ、火から下ろしておきます。
- 大きな鍋でパスタを沸騰したお湯で9分(または袋の表示より1分少なめ)茹でます。湯を切って鍋に戻し、ホワイトソースの大半を加えて絡めます。次にラグーの大半とモッツァレラの大半を加えてさっと混ぜ合わせます。大きめのベーキング皿にパスタ混合物を移し、残りのホワイトソースとラグーを上からかけます。残りのモッツァレラを点在させ、追加のパルメザンを散らします。完全に冷ましたら、包んで冷蔵庫で最大1日、または冷凍庫で最大2ヶ月保存可能。ベイクする前に冷蔵庫で24時間解凍します。
- オーブンを190 °C(ファン付き170 °C/ガス5)に予熱します。ベーキング皿を25〜30分焼き、縁が少しカリッとしてチーズが溶けたら出来上がり。焼きあがったら5〜10分休ませ、そのままテーブルに出して皆で取り分けてどうぞ。
- a mugful of long-grain rice
- a cupful of frozen peas
- 2 tbsp sunflower oil
- 2 back bacon
- rashers, roughly chopped
- 1 small red pepper, chopped
- 2 garlic cloves, thinly sliced
- 2 large eggs
- 1 heaped tsp Chinese five spice powder
- 2 spring onions shredded
step 1
Fill a roomy saucepan with water, bring to the boil and tip in a heaped teaspoon of salt – the water will bubble furiously. Pour in the rice, stir once and return to the boil, then turn the heat down a little so that the water is boiling steadily, but not vigorously.
step 2
Boil uncovered, without stirring (this makes for sticky rice) for 10 minutes. After 8 minutes, throw in the frozen peas, boil for 2 minutes and drain (don’t rinse).
step 3
Heat the sunflower oil in a wok and stir fry the bacon for 3-4 minutes until crisp. Tip in the red pepper and the garlic cloves and stir fry for 2 minutes.
step 4
Beat the eggs, pour into the pan and stir fry until the egg just sets. Toss in the Chinese 5-spice and the rice and peas. Top with the shredded spring onions.
材料(ざいりょう)
ロンググレインライス マグカップ1杯
冷凍グリーンピース カップ1杯
サンフラワーオイル(ひまわり油)大さじ2
ベーコン(バックベーコン)2枚、ざく切り(2
赤パプリカ 小1個、みじん切り
にんにく 2かけ、うす切り
卵 2個
チャイニーズファイブスパイス(五香粉)小さじ1山盛り
青ねぎ(スプリングオニオン)2本、細切り
作り方(つくりかた)
ステップ1:
大きめの鍋に水を入れて沸騰させ、山盛り小さじ1の塩を入れます。
ライスを加えて一度まぜ、再び沸騰したら、火を少し弱めてやや強火で10分ゆでます。
ステップ2:
ふたをせず、かきまぜずに(ねばりを防ぐため)10分ゆでます。8分後に冷凍グリーンピースを入れ、さらに2分ゆでます。その後、水を切ります(すすがないでください)。
ステップ3:
中華なべにサンフラワーオイルを熱し、ベーコンを3〜4分炒めてカリカリにします。
赤パプリカとにんにくを入れて2分炒めます。
ステップ4:
卵をとき、フライパンに加えて軽くかきまぜながら焼きます。卵が少し固まったら、五香粉、ライス、グリーンピースを入れて全体をよく混ぜます。
最後に刻んだ青ねぎをのせて完成です。
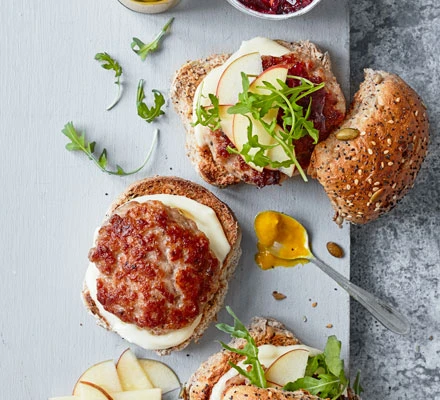
- 300g sausagemeat
- 4 wholemeal burger buns
- 4 tsp onion marmalade
- 2 apples
- cored and thinly sliced
- 2 handfuls rocket
- 2 tsp mayonnaise
- a little English mustard (optional)
- sweet potato wedges
- to serve (optional)
1. Divide the sausage meat into 4 portions and shape into patties. Fry in a non-stick pan for 10–12 mins, flipping a couple of times, until golden on both sides and cooked through.
2. Heat grill to high. Slice the buns in half and toast under the grill, cut-side up.
3. Spread the bottom halves of the toasted buns with marmalade, then layer: burger patty, apple slices, rocket, mayonnaise, and mustard (if using). Top with bun lids. Serve with sweet potato wedges if desired.
材料
ソーセージミート 300g
全粒粉(ホールミール)バンズ 4個
オニオンマーマレード 小さじ4
りんご 2個(芯を取り、薄切り)
ルッコラ(ロケット) 2つかみ
マヨネーズ 小さじ2
イングリッシュマスタード(お好みで、少量)
さつまいもウエッジ(付け合わせ、任意)
作り方
ソーセージミートを4等分してパティに成形します。ノンスティックのフライパンで10〜12分ほど、途中でひっくり返しながら両面がきつね色になり、中まで火が通るまで焼きます。
グリルを高温に熱します。バンズを半分に切り、切り口を上にしてグリルでトーストします。
焼いたバンズの下側にマーマレードを塗り、その上にパティ、りんごのスライス、ルッコラ、マヨネーズ、マスタード(使用する場合)を順に重ねます。バンズの上側をかぶせ、好みでさつまいもウエッジを添えて提供します。
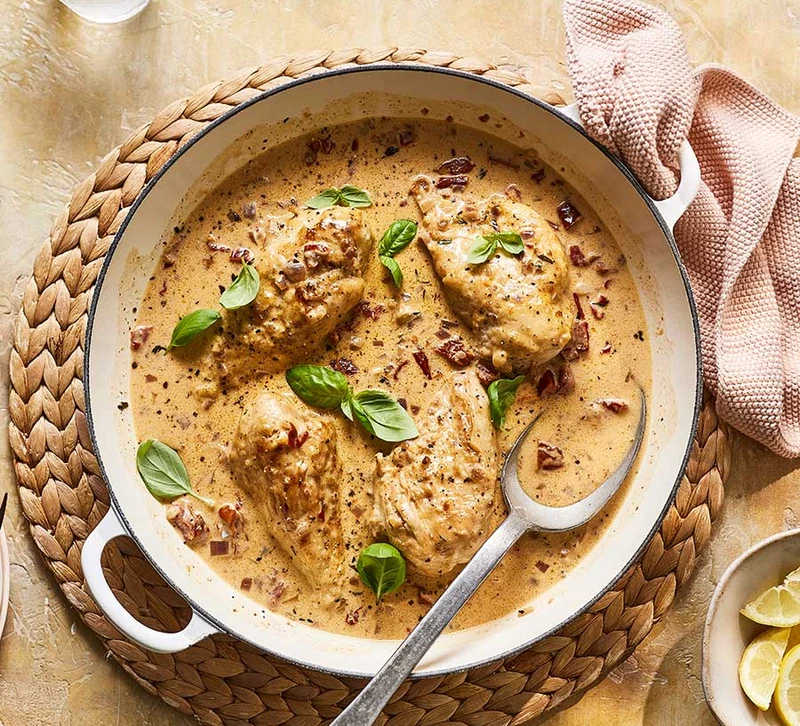
- 30g plain flour
- 4 chicken breasts
- 125g sundried tomatoes
in oil, drained and roughly chopped, - 3 tbsp oil reserve
- 1 red onion, finely chopped
- 3 garlic cloves crushed or finely grated
- ½ – 1 tsp chilli flakes (to taste)
- 2-3 thyme or oregano sprigs, leaves picked, or 1 tsp mixed dried herbs
- 150ml double cream
- 250ml chicken stock
- 35g parmesan grated
- 8-10 basil leaves torn, to serve
- lemon wedges to serve (optional)
step 1
Put the flour on a plate and season with salt and freshly ground black pepper. Coat the chicken in the flour.
step 2
Heat 2 tbsp of the sundried tomato oil in a large, lidded frying pan over a medium heat and fry the chicken for 8-10 mins until golden all over, but not cooked through. Set the chicken aside on a plate.
step 3
Drizzle the remaining 1 tbsp sundried tomato oil into the pan and reduce the heat to medium-low. Fry the onion for 8-10 mins until softened but not golden. Stir in the garlic and cook for another minute before adding the sundried tomatoes, chilli and thyme or oregano, stirring well.
step 4
Add the chicken back to the pan, then pour over the cream and chicken stock, and season well. Put the lid on the pan and cook on medium-low for about 20 mins, turning the chicken halfway through until it is cooked through and the sauce has thickened a little. Stir in the parmesan, then serve with a scattering of basil leaves and lemon wedges on the side for squeezing over, if you like.
日本語訳
薄力粉/小麦粉 30 g
鶏の胸肉 4枚
オイル漬けのドライトマト(油を切って粗く刻む) 125 g
(油を 3 大さじ分取り置く) —
赤タマネギ 1個、みじん切り
ニンニク 3片、すりおろすまたは細かく刻む
チリフレーク(唐辛子粉) ½ ~ 1 小さじ(お好みで調整)
タイムまたはオレガノの小枝(葉を取る)/乾燥ハーブ 2〜3本(または混合乾燥ハーブ 小さじ1)
生クリーム(濃厚なもの)150 ml
チキンストック(もしくはチキンスープ)250 ml
パルメザンチーズ(すりおろし)35 g
バジルの葉 8~10枚(手でちぎる)
レモン(くし形に切ったもの) お好みで添える
作り方
1. 下ごしらえ: 平らなお皿に小麦粉を入れ、塩・粗挽き黒コショウで味を付ける。 鶏肉にその小麦粉をまぶしてコーティングする。 
2. 鶏肉を焼く: 大きめの蓋付きフライパンを中火で熱し、オイル(ドライトマト油のうち 2 大さじ)を入れる。鶏肉を入れ、8~10分ほど、全面がきつね色になるまで焼く。ただしこの時点では完全に火を通さない。 焼けたら一旦お皿に取り出しておく。 
3. 香味野菜を炒める: フライパンに残りの 1 大さじオイルを足し、火を中弱火に下げる。 タマネギを入れて 8~10分、柔らかくなるまで炒める(焦がさないように注意)。 そこにニンニクを加えてさらに1分炒め、ドライトマト、チリフレーク、ハーブを加えてよく混ぜる。 
4. 煮込み: 取り出しておいた鶏肉をフライパンに戻す。生クリームとチキンストックを注ぎ、塩・コショウで味を調える。 蓋をして、中弱火で約20分煮る。途中で鶏肉を裏返し、ソースが少しとろみを帯びるまで煮込む。 
5. 仕上げ: 火を止める直前に、パルメザンチーズを混ぜ入れる。 バジルの葉を散らし、好みでレモンを添えて、絞って食べる。
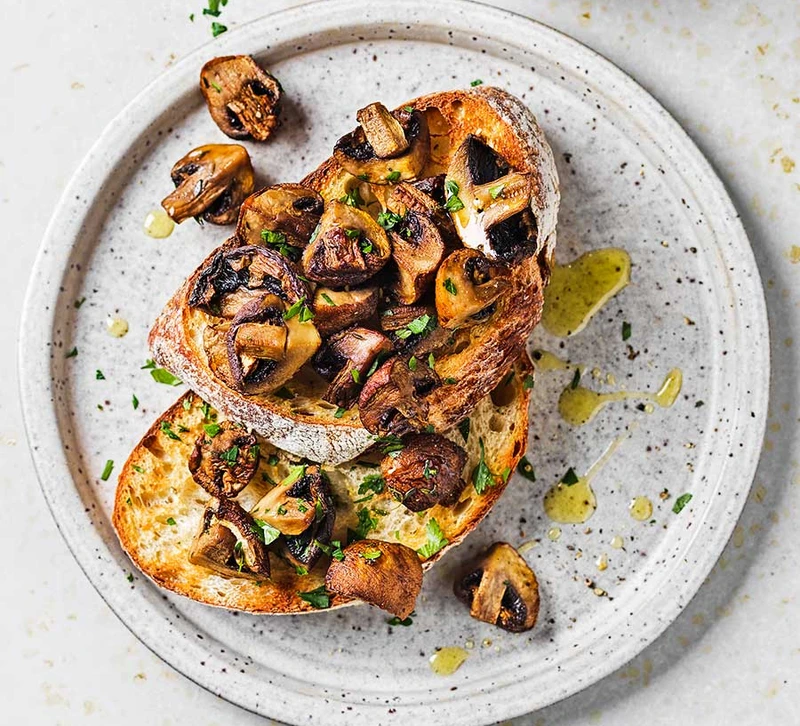
- 300g chestnut mushrooms, quartered or sliced
- a few thyme sprigs leaves picked
- ½ tsp garlic powder
- 1 tbsp vegetable oil
or other neutral oil, plus extra for the bread - 2 slices of sourdough
- 1 garlic clove
- peeled but left whole (optional)
- Small handful of chopped parsley
(optional)
step 1
Tip the mushrooms into a bowl, scatter over the thyme leaves and garlic powder, and season. Stir everything together to combine. Drizzle over the oil and mix again.
step 2
Preheat the air-fryer, if necessary, to 200C. Tip the mushrooms into the basket and cook for 12-15 mins, mixing up halfway through, until golden and beginning to crisp up.
step 3
A few minutes before the end of cooking, toast the bread. If you like, you can rub the toast with a garlic clove for extra flavour. Drizzle with a little oil, then spoon over the mushrooms. Scatter with parsley, if you like.
概要
分量:2人分
準備時間:5分
調理時間:12~15分
特性:乳製品不使用/卵不使用/ヴィーガン対応/ベジタリアン対応
作り方
下準備
ボウルにキノコを入れ、タイムの葉を散らし、ガーリックパウダーを振りかけ、塩・こしょうで味を調える。
全体に絡むように混ぜたら、植物油を回しかけ、さらに軽く混ぜる。
エアフライヤーで調理
必要であればエアフライヤーを200℃に予熱する。
キノコをバスケットに入れ、12〜15分加熱する。途中で一度かき混ぜ、キノコが黄金色になり、端が少しカリッとしてきたら良い。
パンの用意 & 盛り付け
調理終了の少し前にパンをトーストする。
好みで、トーストしたパンにニンニク片をこすりつけて風味を出す。
パンに少量の油を垂らし、その上にキノコをのせ、もしあればパセリを散らす。
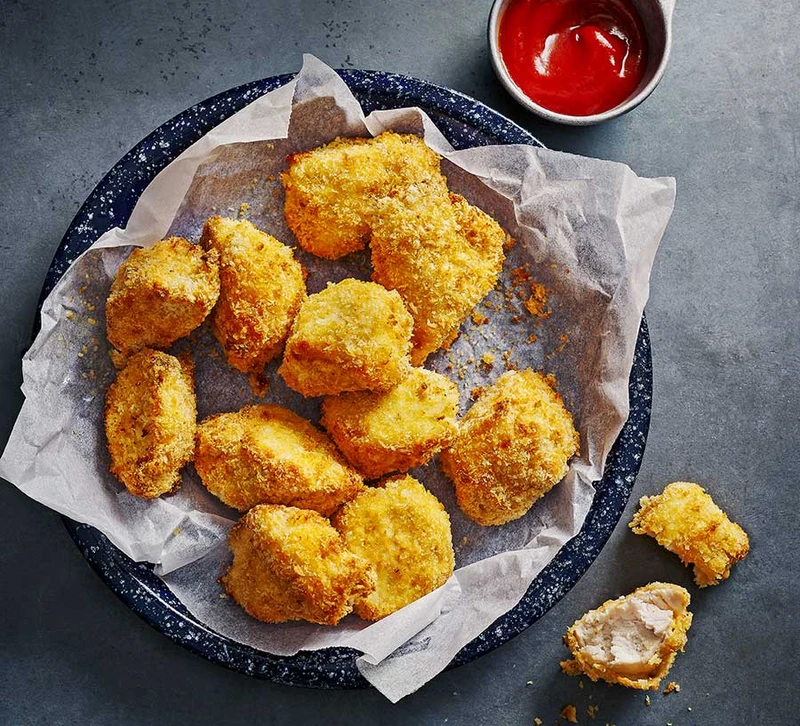
150g plain flour
½ tsp garlic powder
½ tsp smoked paprika
1-2 eggs beaten
120g panko breadcrumbs
3 chicken breasts (about 600g), cut into bite-sized pieces
ketchup to serve
Step 1
Combine the flour, garlic powder, paprika, ½-1 tsp salt and a few cracks of freshly ground black pepper on a plate. Tip the beaten egg onto another plate and the breadcrumbs onto a third.
Step 2
Toss the chicken pieces in the flour mix, then the egg, and finally the breadcrumbs. Set aside on a tray. Heat the air-fryer to 200C, then cook the chicken nuggets in a single layer (you may need to do this in batches) for 10-12 mins until cooked through and golden brown. Serve with ketchup, if you like.
材料
薄力粉 … 50 g
ガーリックパウダー … 小さじ½
スモークパプリカ … 小さじ½
卵 … 1〜2個(溶き卵にする)
パン粉(パン粉/日本の “panko”) … 120 g
鶏むね肉 … 約 600 g(三枚肉を一口大に切る)
ケチャップ … お好みで(添えて出す用)
作り方
まず、別々の皿に次のように準備する:
粉用の皿:薄力粉、ガーリックパウダー、スモークパプリカ、塩(½~1 小さじ)、ブラックペッパー(ひとふり)を混ぜ合わせる
卵用の皿:溶き卵を入れておく
パン粉用の皿:パン粉を入れておく
鶏肉片を 粉 → 卵 → パン粉 の順でまぶしていく。すべてコーティングできたら、トレイに並べておく(重ならないように)
エアフライヤーを 200℃ に予熱する。ナゲットを重ならないように単層で入れ、10〜12分加熱する。途中で一度ひっくり返すか位置を変えるとムラなく焼ける。焼きあがるまで、外側がきつね色になり、中まで火が通るようにする
焼きあがったら、ケチャップなどを添えて提供する

1 tbsp olive oil | ||
2 garlic cloves, crushed | ||
5 sundried tomatoes, roughly chopped | ||
3 × 400g cans plum tomatoes | ||
500 ml turkey or vegetable stock | ||
1 tsp sugar (any type, or more to taste) | ||
140 ml soured cream | ||
1 tbsp pesto | ||
Basil leaves, to serve |
Heat the butter or oil in a large pan, then add the garlic and soften for a few minutes over a low heat. Add the sundried tomatoes, canned tomatoes, stock, sugar and seasoning, then bring to a simmer. Let the soup bubble for 10 mins until the tomatoes have broken down a little. | ||
| Whizz with a stick blender, adding half the pot of soured cream as you go. Taste and adjust the seasoning – add more sugar if you need to. Serve in bowls with 1 tbsp or so of the pesto swirled on top, a little more soured cream and scatter with basil leaves. |
|
材料
オリーブオイル 大さじ1 にんにく 2片(つぶす) サンドライドトマト 5個(ざっくり刻む) プラムトマト缶400g ×3缶
|
作り方
1. 大きな鍋にバターまたは油を熱し、にんにくを加えて弱火で数分柔らかくする。サンドライドトマト、トマト缶、スープストック、砂糖、調味料を加え、弱〜中火で煮る。トマトが少し崩れるまで10分ほど沸騰させます。〈オオキナ ナベ ニ バター マタハ アブラ オ ネツシ、ニンニク オ クワエテ ヨワビ デ スウフン ヤワラカク スル。サンドライド トマト、トマトカン、スープストック、サトウ、チョウミリョウ オ クワエ、ヨワ〜チュウビ デ ニル。トマト ガ スコシ クズレル マデ ジュップン ホド フットウサセル。〉
2. ハンドブレンダーでスープを滑らかにしつつ、サワークリームの半量を途中で加える。味を見て調味を調整し、必要なら砂糖を追加。器に盛って、上にペストを大さじ1ほど回しかけ、さらに少しサワークリームをのせ、バジルの葉を散らして出す。〈ハンドブレンダー デ スープ オ ナメラカニ シツツ、サワークリーム ノ ハンリョウ オ トチュウ デ クワエル。アジ オ ミテ チョウミ オ チョウセイシ、ヒツヨウ ナラ サトウ オ ツイカ。ウツワ ニ モッテ、ウエ ニ ペスト オ オオサジ イチ ホド カイカケ、サラニ スコシ サワークリーム オ ノセ、バジル ノ ハ オ チラシテ ダス。〉
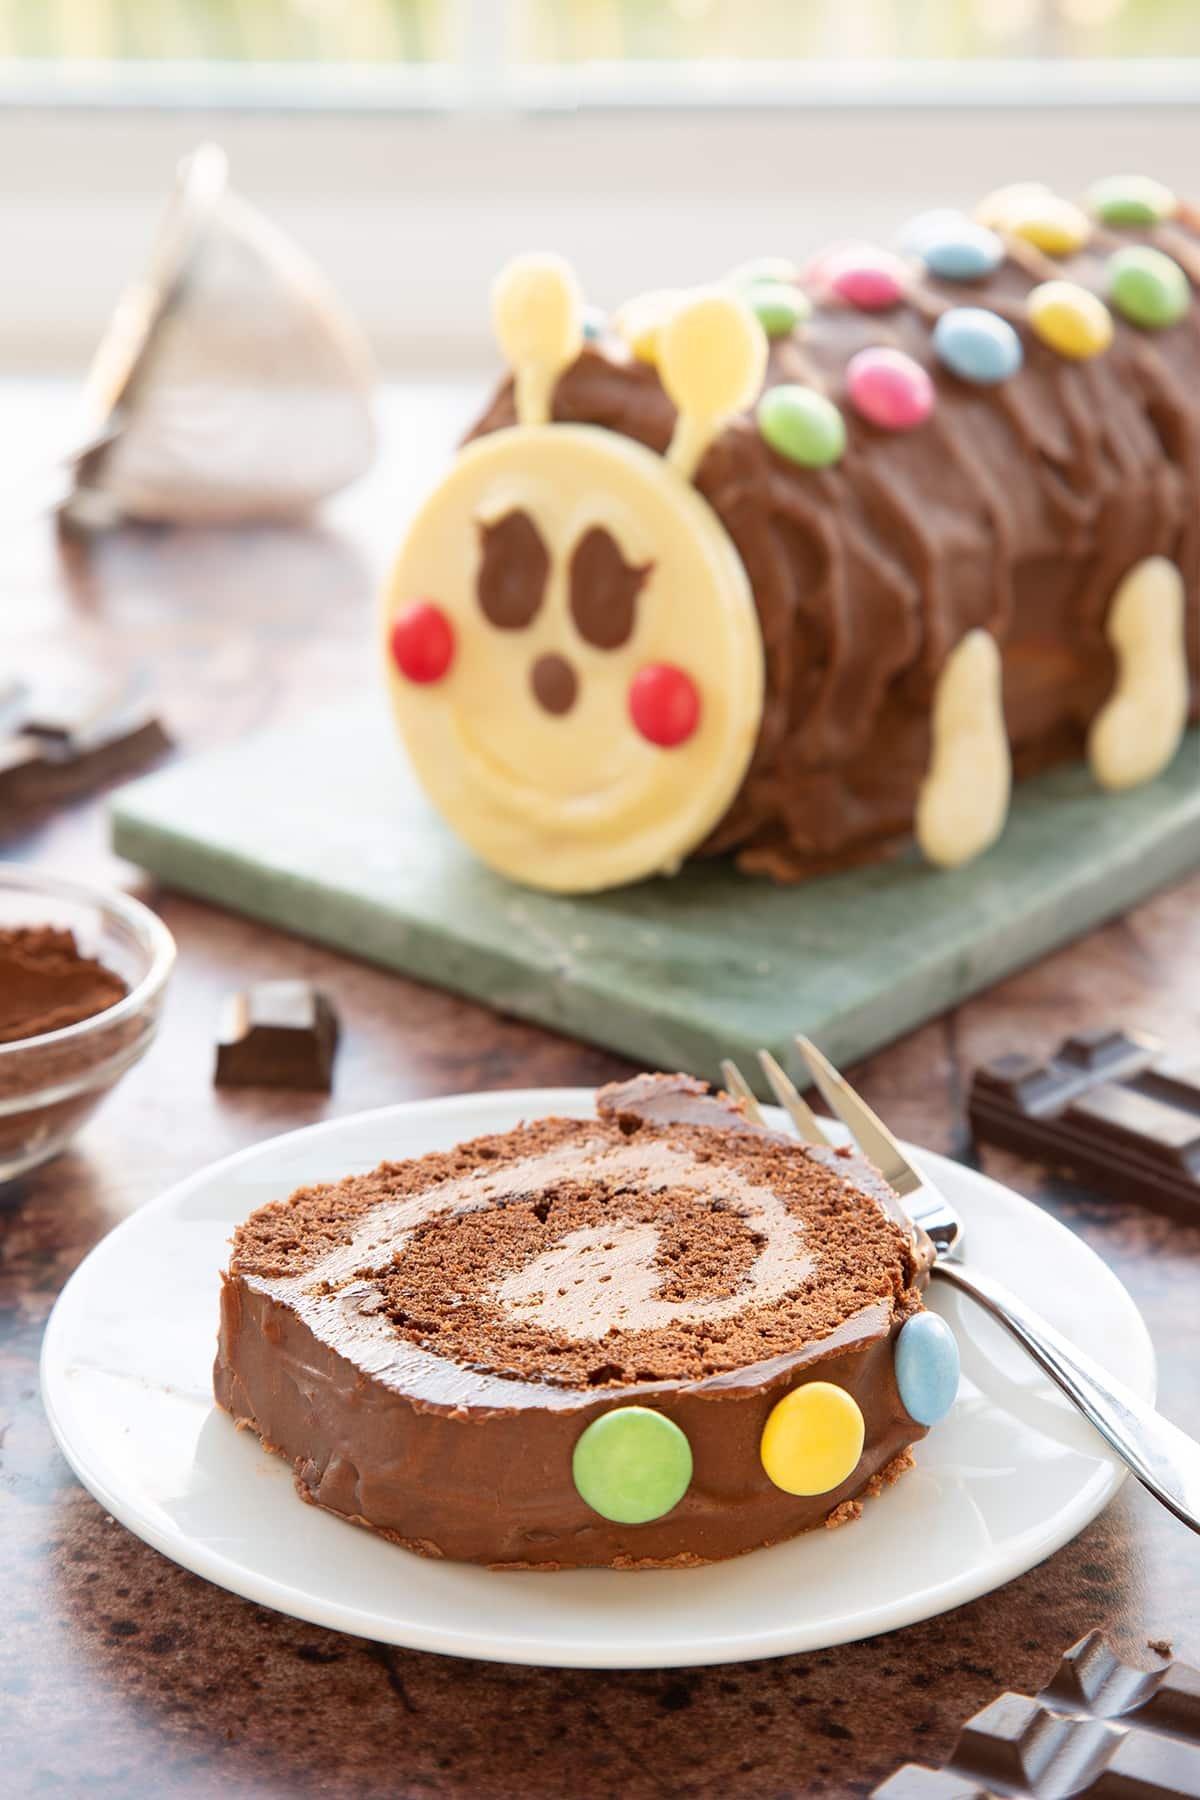
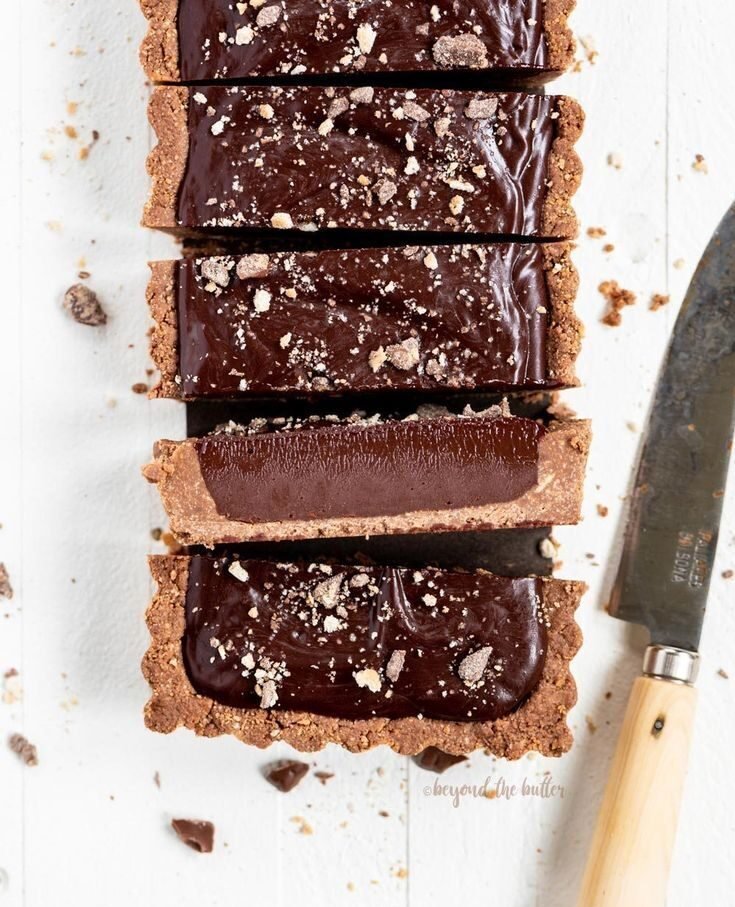
Chocolate Swiss Roll
• 3 large eggs
• 135 g caster sugar
• 1 tsp vanilla extract
• 50 g cocoa powder (unsweetened)
• 85 g plain (all-purpose) flour
• Pinch of salt
Buttercream Filling
• 200 g unsalted butter (softened)
• 350 g icing sugar (powdered sugar)
• 150 g milk chocolate, melted & cooled slightly
Crunchy Chocolate Shell
• 400 g good-quality milk chocolate (e.g. Callebaut, Meij)
• 100 g white chocolate (for face, feet, details)
• Small chocolate beans or Smarties for spot
Bake the Swiss Roll
1. Heat oven to 200 °C (180 °C fan). Line a 30 × 25 cm Swiss roll tin with baking paper.
2. Beat eggs, sugar, and vanilla until thick, pale, and airy (about 5 min with an electric whisk).
3. Sift together flour, cocoa, and salt. Gently fold into egg mixture.
4. Spread evenly in tin. Bake 8–10 min—springy to touch.
5. Turn onto a sugared sheet of baking paper, peel off lining, roll up loosely from a short end while warm, and cool rolled up
Make the Buttercream
1. Beat butter until fluffy.
2. Add icing sugar in batches.
3. Mix in cooled melted milk chocolate until smooth.
Fill & Shape
1. Gently unroll sponge. Spread buttercream evenly.
2. Re-roll carefully. Wrap in parchment or clingfilm. Chill 30 min so it firms.
Temper the Milk Chocolate for a Crunchy Shell
(Use a thermometer for best results)
1. Chop 300 g chocolate finely (reserve 100 g).
2. Melt the 300 g to 45 °C over a double boiler or short microwave bursts.
3. Cool by stirring in half the reserved chocolate until temperature drops to 27 °C.
4. Reheat gently to 30–31 °C—this is temper point for milk chocolate.
5. Discard any unmelted lumps if necessary.
Coat the Caterpillar
1. Place chilled Swiss roll on a wire rack over parchment.
2. Pour/spread tempered chocolate evenly. Work quickly—press chocolate beans/spots on before it sets.
3. Optional second coat: After the first layer begins to set (5–10 min), repeat tempering with remaining chocolate and coat again for extra crunch.
Add Face & Feet
1. Melt and temper white chocolate. Pipe or mould a face and feet on baking paper. Let them set fully.
2. Use a dab of leftover milk chocolate to glue face & feet in place. Add eyes/mouth with dark or milk chocolate.
Set & Serve
• Leave at cool room temp (~20 °C) or a short fridge blast (10 min) to harden. Avoid long fridge storage to prevent bloom.
材料
チョコレートスポンジ(スイスロール)
• 卵 3個
• グラニュー糖 135g
• バニラエッセンス 小さじ1
• 無糖ココアパウダー 50g
• 薄力粉 85g
• 塩 ひとつまみ
バタークリームフィリング
• 無塩バター(室温に戻す)200g
• 粉砂糖 350g
• ミルクチョコレート(溶かして冷ます)150g
カリッとしたチョコレートシェル
• ミルクチョコレート(クーベルチュールなど良質なもの)400g
• ホワイトチョコレート 100g(顔・足・飾り用)
• チョコレートビーンズまたはスマーティーズ(背中の斑点用)
作り方
1. スポンジを焼く
オーブンを200℃(ファン180℃)に予熱し、30×25cmの天板にベーキングシートを敷く。
卵、砂糖、バニラをボウルで約5分、白くもったりするまで泡立てる。
薄力粉、ココア、塩をふるい入れ、さっくりと混ぜる。
天板に平らに流し入れ、8〜10分焼く(指で押すと弾力が出る程度)。
砂糖をふったベーキングシートにひっくり返し、敷紙をはがして、温かいうちに短い辺から巻き、巻いたまま冷ます。
2. バタークリームを作る
バターをふわっとするまで混ぜる。
粉砂糖を数回に分けて加え、よく混ぜる。
溶かして冷ましたミルクチョコレートを加え、なめらかになるまで混ぜる。
3. フィリングを入れて成形
スポンジをそっと広げ、バタークリームを均一に塗る。
もう一度丁寧に巻き、ラップまたはクッキングシートで包み、冷蔵庫で30分冷やす。
4. ミルクチョコレートをテンパリングしてカリッと仕上げる
(温度計を使用すると確実です)
チョコレート300gを細かく刻み、100gは取っておく。
ボウルを湯せんにかけ、300gを45℃まで溶かす。
火から下ろし、残りの半量のチョコを加えながら混ぜ、温度を27℃まで下げる。
さらに30〜31℃までごく軽く温め直す(ミルクチョコのテンパリング温度)。
5. ケーキをコーティング
冷えたロールケーキを網の上に置き、下にクッキングシートを敷く。
テンパリングしたチョコを素早く流しかけ、全体に広げる。
まだ固まらないうちにチョコビーンズやスマーティーズを押し付けて飾る。
より厚いシェルにしたい場合は、5〜10分ほど置いてから再度テンパリングし、2回目のコーティングをする。
6. 顔と足を付ける
ホワイトチョコを溶かしてテンパリングし、ベーキングシートの上で顔と足の形に流して固める。
残ったミルクチョコで顔と足を本体に接着し、目や口を描く。
7. 固めて仕上げ
室温(約20℃)で置いて固めるか、冷蔵庫で短時間(10分程度)冷やす。
切るときは鋭い包丁を使用し、パリッという音を楽しんでください。
• 200g bread mix (or strong flour + yeast)
• 8 sausages
• 1 tbsp wholegrain mustard
• 1 egg, beaten
• 1 tbsp olive oil
• 3 red onions, cut into wedges
• 2 tbsp brown sugar (use honey if needed)
• 2 tbsp red wine vinegar (or rice vinegar)
• 4 tbsp grated cheese
1. Prepare the dough
Make the bread dough following the packet instructions, or mix flour + yeast to form a basic bread dough. Roll out and cut into four large diamond shapes (about 12cm across).
2. Cook the sausages
Lightly fry the sausages until browned. Remove and set aside.
3. Assemble the pasties
Spread a little mustard and sprinkle cheese in the centre of each diamond. Place two sausages on top, then fold the bottom point up and the sides in to wrap them. Brush the tops with beaten egg. Place on a baking tray, rest for 5–10 minutes, then bake in a preheated oven (or toaster oven, or air fryer) at 200°C (fan 180°C) for 15–20 minutes until golden brown.
4. Make the sticky onions
In the same pan, wipe away most of the fat, then fry the onions on medium heat for 10 minutes until soft. Add sugar and vinegar, then cook another 10 minutes, stirring, until sticky and caramelised.
5. Serve
Serve the hot dog pasties with a generous spoonful of sticky onions. Add ketchup if you like.
材料
パンミックス200g(または強力粉+ドライイースト)
ソーセージ8本(ウインナーでもOK)
粒マスタード 大さじ1(または和からし+マスタード)
卵1個(溶き卵)
オリーブオイル大さじ1(サラダ油でも可)
赤玉ねぎ3個(普通の玉ねぎでも可)
ブラウンシュガー大さじ2(はちみつ・黒糖でも可)
赤ワインビネガー大さじ2(穀物酢+砂糖でも可)
とろけるチーズ大さじ4(スライスチーズ刻んでもOK)
作り方
1. パン生地を作り、伸ばして12cmくらいのひし形を4枚に切る。
2. ソーセージを軽く焼き色がつくまで炒め、取り出す。
3. 生地の中央にマスタードとチーズをのせ、ソーセージを2本置く。生地を包み、卵を塗る。
4. 5〜10分休ませ、200℃(ファン180℃)で15〜20分焼き、きつね色にする。
5. 玉ねぎを10分炒め、砂糖と酢を加える。さらに10分炒め、トロッとさせる。
6. パスティーズにキャラメルオニオンを添え、好みでケチャップも一緒に出す。

Puff Pastry: 250 g plain flour, ¼ tsp salt, 150 g unsalted butter, cold and cubed, 125 ml ice-cold water
Cheese & Bacon turnover: 1 sheet (about 320 g before rolling) homemade puff pastry (see above), 3 tbsp soft cheese (e.g. cream cheese), 1 tsp Dijon mustard (optional), 6 rashers dry‑cured smoked bacon, 100 g mature cheddar (or gruyère/Swiss), grated, 1 egg, beaten (for egg wash)
Puff Pastry:
1. Mix flour and salt. Add cubed butter and rub lightly with fingertips until mixture resembles coarse meal with pea‑sized lumps of butter.
2. Add cold water gradually, stirring until dough just comes together—don’t over-mix.
3. Shape into a square, wrap in cling film, and chill for 30 minutes.
4. Roll dough to a rectangle roughly 30 × 20 cm on a lightly floured board.
5. Fold (turn):
• Fold top third down and bottom third up, like a letter.
• Rotate 90°, roll out again, and repeat the fold.
• Wrap and chill for 30 minutes.
• Repeat this rolling-and-folding 3–4 times.
6. After final turn, wrap and chill for at least 1 hour (or overnight).
• This layering creates the puff when baked.
Cheese & Bacon Turnovers
1. Heat oven to 200 °C (180 °C fan) / gas mark 6.
2. Roll pastry into a rectangle (~35 × 22 cm), then cut into 6 squares.
3. Mix soft cheese with mustard and pepper. Spread along diagonal of each square.
4. Layer one bacon rasher over the cheese, then top with grated cheddar.
5. Brush two opposite corners with beaten egg. Fold pastry over to form a triangle and press edges to seal.
6. Egg‑wash tops, place on baking parchment, and bake for 15–20 minutes until pastry is puffed and golden and cheese is melted.
7. Cool on a rack for 5–10 minutes. Store in an airtight container—fridge for up to 3 days
材料
薄力粉 250g, 塩 小さじ¼, 無塩バター(冷たいもの、角切り)150g, 氷水 125ml
材料(6個分)
自家製パイ生地 約1枚(320g程度), クリームチーズ 大さじ3, ディジョンマスタード 小さじ1(お好みで), ベーコン(乾塩、スモーク)6枚, チェダーチーズ(またはグリュイエール/スイスチーズ) 100g(すりおろし), 卵 1個(溶き卵、ツヤ出し用)
作り方
1. ボウルに薄力粉と塩を入れ混ぜる。冷たいバターを加え、指先でそっとすり合わせて、バターの塊が小豆〜グリーンピース大になるまで混ぜる。
2. 氷水を少しずつ加え、切るように混ぜてひとまとめにする。こねすぎないこと。
3. 生地を正方形にまとめてラップで包み、冷蔵庫で30分休ませる。
4. 台に打ち粉をし、生地を約30×20cmの長方形に伸ばす。
5. 三つ折りにする:
• 上から1/3を中央へ折り下げ、下から1/3を上へ折る(封筒のように)。
• 生地を90度回転させ、再び同じ大きさに伸ばして同じように三つ折りにする。
• ラップで包み、冷蔵庫で30分冷やす。
• この伸ばしと折りを3〜4回繰り返す。
6. 最後の折りが終わったら、ラップに包んで1時間以上(できれば一晩)冷蔵庫で休ませる。
• これで何層ものバターと生地ができ、焼くとサクサクに膨らむ。
作り方
1. オーブンを200°C(ファン180°C)に予熱する。
2. 生地を約35×22cmの長方形に伸ばし、6等分の正方形に切る。
3. クリームチーズとマスタード、黒こしょうを混ぜ、各正方形の対角線に沿って塗る。
4. チーズの上にベーコンを1枚ずつ置き、さらにすりおろしたチーズをのせる。
5. 正方形の対角線上の2つの角に溶き卵を塗り、対角に折って三角形にし、端を押さえて閉じる。
6. 表面に溶き卵を塗り、クッキングシートを敷いた天板にのせる。
7. 15〜20分焼き、パイ生地がふっくらときつね色になり、チーズが溶けていればOK。
8. 焼き上がったら5〜10分冷ます。保存する場合は密閉容器に入れて冷蔵庫で3日程度保存可能。
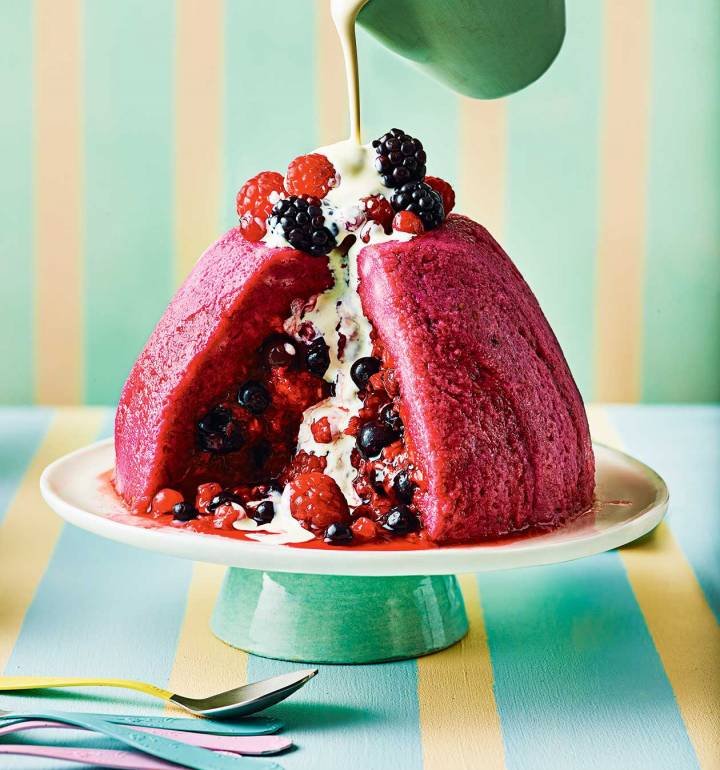
300g strawberry, 250g blackberry, 100g redcurrants, 500g raspberry OR 1.25kg/2lb 12oz mixed berries and currants
of your choice, 175g golden caster sugar, 7 slices day-old white bread from a square, medium-cut loaf
Step 1: Wash fruit and gently dry on kitchen paper – keep strawberries separate. Put sugar and 3 tbsp water into a large pan. Gently heat until sugar dissolves – stir a few times. Bring to a boil for 1 min, then tip in the fruit (not strawberries). Cook for 3 mins over a low heat, stirring 2-3 times. The fruit will be softened, mostly intact and surrounded by dark red juice. Put a sieve over a bowl and tip in the fruit and juice.
step 2: Line the bowl with cling film and prepare the bread: Line the 1.25-litre basin with cling film as this will help you to turn out the pudding. Overlap two pieces of cling film in the middle of the bowl as it’s easier than trying to get one sheet to stick to all of the curves. Let the edges overhang by about 15cm. Cut the crusts off the bread. Cut 4 pieces of bread in half, a little on an angle, to give 2 lopsided rectangles per piece. Cut 2 slices into 4 triangles each and leave the final piece whole.
Step 3: Build the pud: Dip the whole piece of bread into the juice for a few secs just to coat. Push this into the bottom of the basin. Now dip the wonky rectangular pieces one at a time and press around the basin’s sides so that they fit together neatly, alternately placing wide and narrow ends up. If you can’t quite fit the last piece of bread in it doesn’t matter, just trim into a triangle, dip in juice and slot in. Now spoon in the softened fruit, adding the strawberries here and there as you go.
Step 4: Let flavours mingle then serve: Dip the bread triangles in juice and place on top – trim off overhang with scissors. Keep leftover juice for later. Bring cling film up and loosely seal. Put a side plate on top and weight down with cans. Chill for 6 hrs or overnight. To serve, open out cling film then put a serving plate upside-down on top and flip over. serve with leftover juice, any extra berries and cream.
材料(8人分/直径約15cmのボウルまたはプディング型/容量1.25 L)
• 冷凍・生合わせてベリー類 1.25 kg(例:イチゴ300 g、ブラックベリー250 g、レッドカラント100 g、ラズベリー500 g) 
• ゴールデンキャスターシュガー(粗めの白砂糖) 175 g
• 白食パン(1日経ったもの)7枚(中厚スライス/端は取り除く)
作り方
1. フルーツの準備
イチゴは洗って軽く水けを拭き、他のベリー類と分けておきます。
鍋に砂糖と水 大さじ3を入れて弱火にかけ、砂糖が溶けたら中火にして1分沸騰させます。ベリー(イチゴ以外)を加え、弱火で3分ほど煮ます。フルーツは形を残したまま、濃い赤い果汁のみが出る状態にします。ザルで果汁と果実を分け、果汁は別のボウルに受けておきます。()
2. 型の準備
内側にラップを敷きます。2枚を重ねて中心から外側に向かって敷き、15 cmほど型からはみ出す長さを残しておくと取り出しやすいです。パンの耳を落とし、4枚は斜めに2分割、2枚はそれぞれ4つの三角形に切り、1枚は丸ごと残しておきます。 
3. パンを型に並べる
丸ごとのパンを果汁に軽く浸して底に敷きます。斜め長方形のものを果汁に浸し、型の側面に幅と狭さを交互に向けながら隙間なく並べます。最後に入れにくければ、三角形に切って調整して構いません。()
4. フルーツと仕上げ
柔らかく煮たベリー類を層になるようにパンの中へ投入し、イチゴも散らします。最後に三角形のパンを果汁に浸して型の上にふたをし、はみ出たラップははさみでカットします。果汁は捨てずに取っておきましょう。()
5. 冷やし固める
ラップを上から覆い、皿をのせて重し(缶詰など)を上に置いて、冷蔵庫で6時間以上、できれば一晩置いてしっかり染み込ませます。()
6. 型から出す & 盛り付け
皿を取り、別のお皿を反対に重ねて上下逆にして型から出します。取り置いた果汁や追加のベリー、生クリームなどを添えてどうぞ。()
フル・イングリッシュ・ブレックファスト
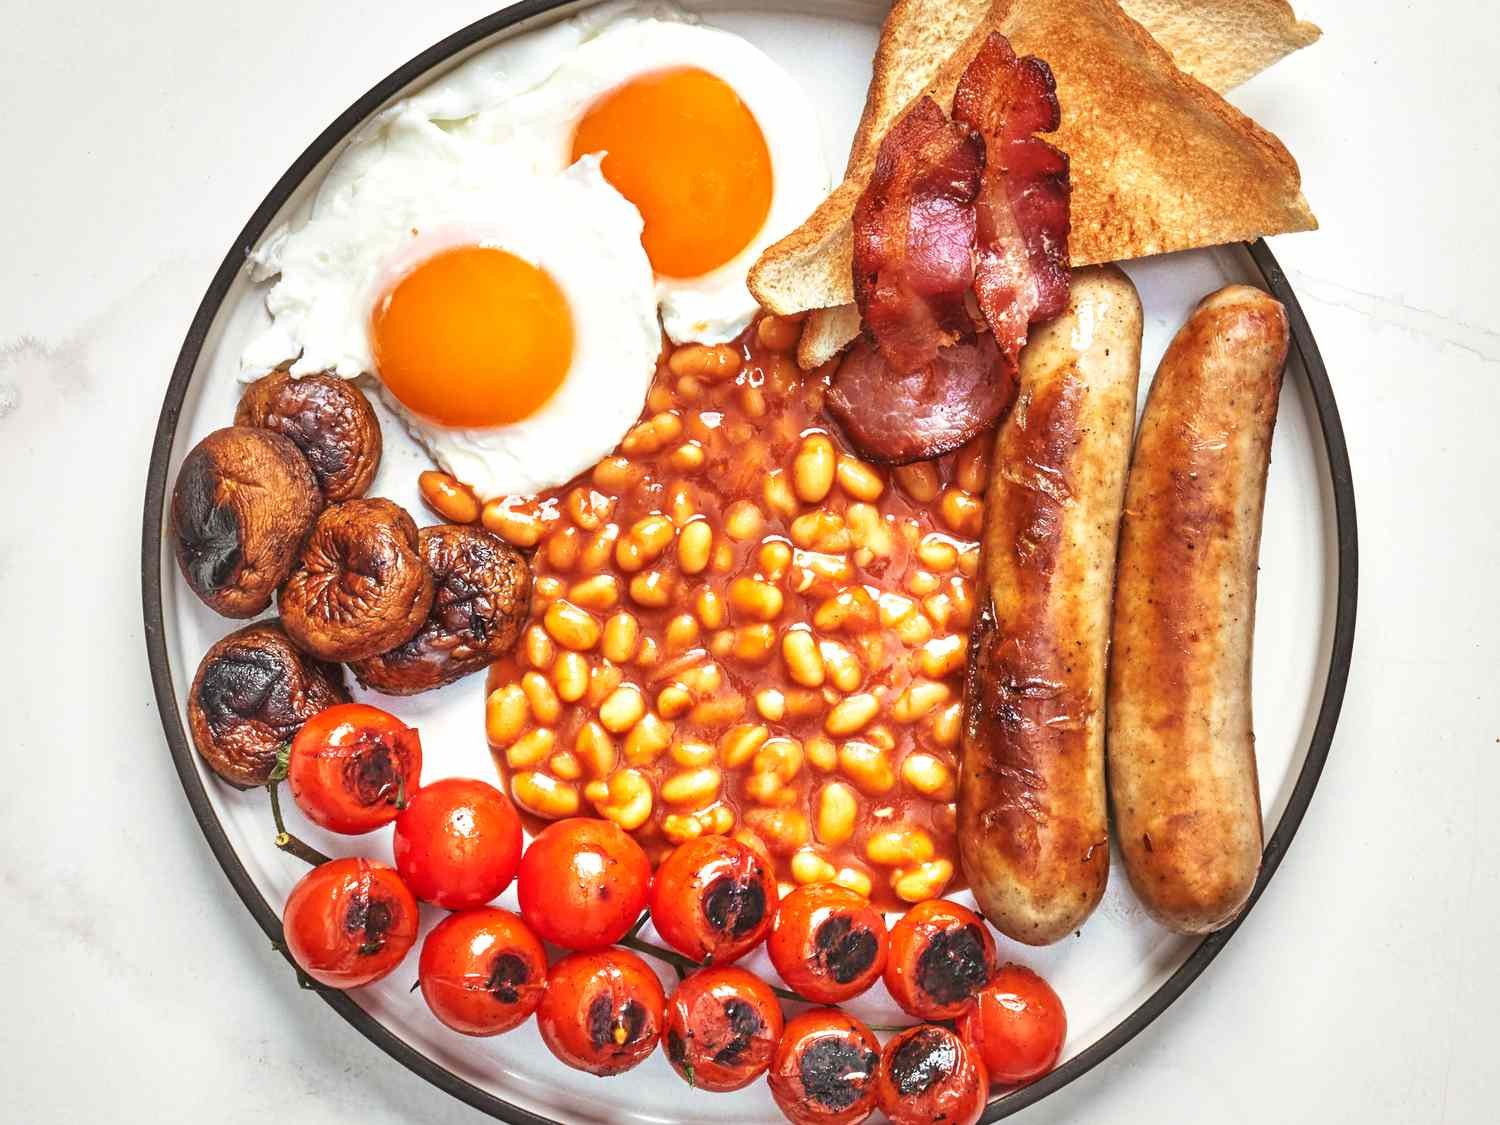
A classic English breakfast, a great way to get some energy!
クラシックなイングリッシュ・ブレックファストは、エネルギーをチャージする最高の方法です!
2 pork sausages, 2 rashers of back bacon, 1 or 2 large eggs, 1 slice of bread (for toast), 100g baked beans (half a small can), 1 tomato (halved), 4–6 button mushrooms, 1–2 frozen hash browns (or homemade), Butter (for toast and frying), Cooking oil, Salt & pepper.
1️⃣ Cook the hash browns: If using frozen hash browns, cook them first. Heat a little oil in a frying pan over medium-high heat. Fry for about 5–7 minutes on each side, or until golden and crispy. Keep warm in the oven if needed.
2️⃣ Cook the sausages: In the same or a separate pan, heat a little oil. Cook sausages for about 12–15 minutes, turning until browned and cooked through.
3️⃣ Cook the bacon: Add bacon to the pan and fry until crispy or as you like.
4️⃣ Cook mushrooms and tomato: In another small pan, melt a bit of butter. Fry the mushrooms until golden brown. Add the tomato, cut side down, and fry until soft.
5️⃣ Heat the beans: Warm the baked beans in a small saucepan over low heat.
6️⃣ Fry the egg: Wipe the main pan if needed. Add a bit of oil or butter, crack in the egg, and fry until the white is cooked and the yolk is how you like it.
7️⃣ Toast the bread: Toast the bread and butter it.
8️⃣ Serve: Arrange everything on a warm plate — sausages, bacon, fried egg, mushrooms, tomato, baked beans, hash browns, and buttered toast.
ポークソーセージ 2本, ベーコン(バックベーコン)2枚, 卵 1個, 食パン 1枚(トースト用), ベイクドビーンズ 100g(缶詰の半分くらい), トマト 1個(半分に切る), マッシュルーム(小)4~6個, ハッシュブラウン(冷凍でもOK)1~2個, バター(トースト用・炒め用), サラダ油, 塩・こしょう
作り方
1️⃣ ハッシュブラウンを焼く: 冷凍の場合は、まずハッシュブラウンを焼きます。フライパンに油を熱し、中火~強火で片面5~7分ずつ、きつね色になるまで焼きます。焼けたら、オーブンなどで保温しておきます。
2️⃣ ソーセージを焼く: 別のフライパンに油を熱し、ソーセージを入れて中火で12~15分、全体がこんがりするまで転がしながら焼きます。
3️⃣ ベーコンを焼く: 同じフライパンにベーコンを加え、好みの焼き加減になるまで焼きます。
4️⃣ マッシュルームとトマトを焼く: 別の小さなフライパンにバターを溶かし、マッシュルームを入れてきつね色になるまで炒めます。半分に切ったトマトを切り口を下にして焼き、柔らかくする。
5️⃣ ベイクドビーンズを温める: 小鍋にベイクドビーンズを入れ、弱火で温める。
6️⃣ 卵を焼く: メインのフライパンをきれいにして油かバターを熱し、卵を割り入れます。白身が固まり黄身が好みの固さになるまで焼きます。
7️⃣ パンをトーストする: 食パンをトースターで焼き、バターを塗る。
8️⃣ 盛り付ける: 温めた皿に、ソーセージ、ベーコン、卵、マッシュルーム、トマト、ベイクドビーンズ、ハッシュブラウン、トーストをきれいに盛り付けます。
塩・こしょうで味を調えて、紅茶と一緒にどうぞ!☕🍽️
エッグベネディクト / ロワイヤル

This goes great with last week’s eggs Benedict, it’s a light and delicious bread that can be used with many different foods.
先週のエッグベネディクトにもぴったり合います。
これは軽くて美味しいパンで、いろいろな料理に使えます。
400 g strong white flour, plus extra for dusting, 1 tsp caster sugar, 5 g fast‑action yeast, 1 tsp salt, 250 ml whole milk, warmed, Fine semolina (for dusting)
Method
1. Mix: In a large bowl, combine flour, sugar, yeast, and salt. Gradually add warm milk, mixing by hand until a dough forms. Knead for 8–10 minutes until smooth and elastic (or use a stand mixer with a dough hook) .
2. Shape & First Rise: Roll dough out to about 1 cm thickness on a lightly floured surface. Use a 7–8 cm cutter to cut out ~8 circles. Place on semolina‑dusted trays, dust tops with semolina, cover loosely, and let rise in a warm spot for ~1 hour until doubled. For deeper flavor, you can prove overnight in the fridge .
3. Cook: Heat a heavy frying pan or griddle to medium‑low and cook muffins 6–7 minutes per side until golden and cooked through. If they brown too quickly, reduce heat. Transfer to a wire rack to cool slightly .
4. Serve & Store: Best enjoyed warm or toasted. Store in an airtight container for up to three days once cooled
🍞 イングリッシュ・マフィン(約8個分)
材料(ざいりょう)
強力粉(きょうりきこ):400g, グラニュー糖(とう ):小さじ1, ドライイースト:5g, 塩(しお ):小さじ1, 温かい牛乳(あたたかい ぎゅうにゅう ):250ml, セモリナ粉(こ):少し(打ち粉用)
作り方(つくりかた)
① こねる
大きいボウルに、強力粉・砂糖・イースト・塩を入れます。温かい牛乳を少しずつ入れて、手でまぜてこねます。
生地(きじ)がなめらかになるまで、8~10分こねます。
(または、ミキサーの「こねフック」でもOK)
② 形を作って1次発酵(いちじ はっこう)
打ち粉(うちこ)をした台に生地を出して、1cmの厚さにのばします。7~8cmの丸い型(またはコップ)で8個に切ります。トレーにセモリナ粉をふり、その上にマフィンをのせます。上にもセモリナ粉をふり、ゆるくラップをかけて、1時間 発酵させます。
※冷蔵庫で一晩ねかせてもOK。
③ 焼く(やく)
フライパン(またはホットプレート)を弱火(よわび)にします。マフィンを入れて、6~7分ずつ、両面(りょうめん)を焼きます。きつね色になったらOK。焦げそうなら火をもっと弱くします。焼けたら、ラックやお皿の上で少し冷まします。
④ 食べる&保存(ほぞん)
焼きたてでも、トーストしてもおいしいです。完全に冷めたら、ふた付きの容器に入れて、3日以内に食べましょう。
エッグベネディクト / ロワイヤル
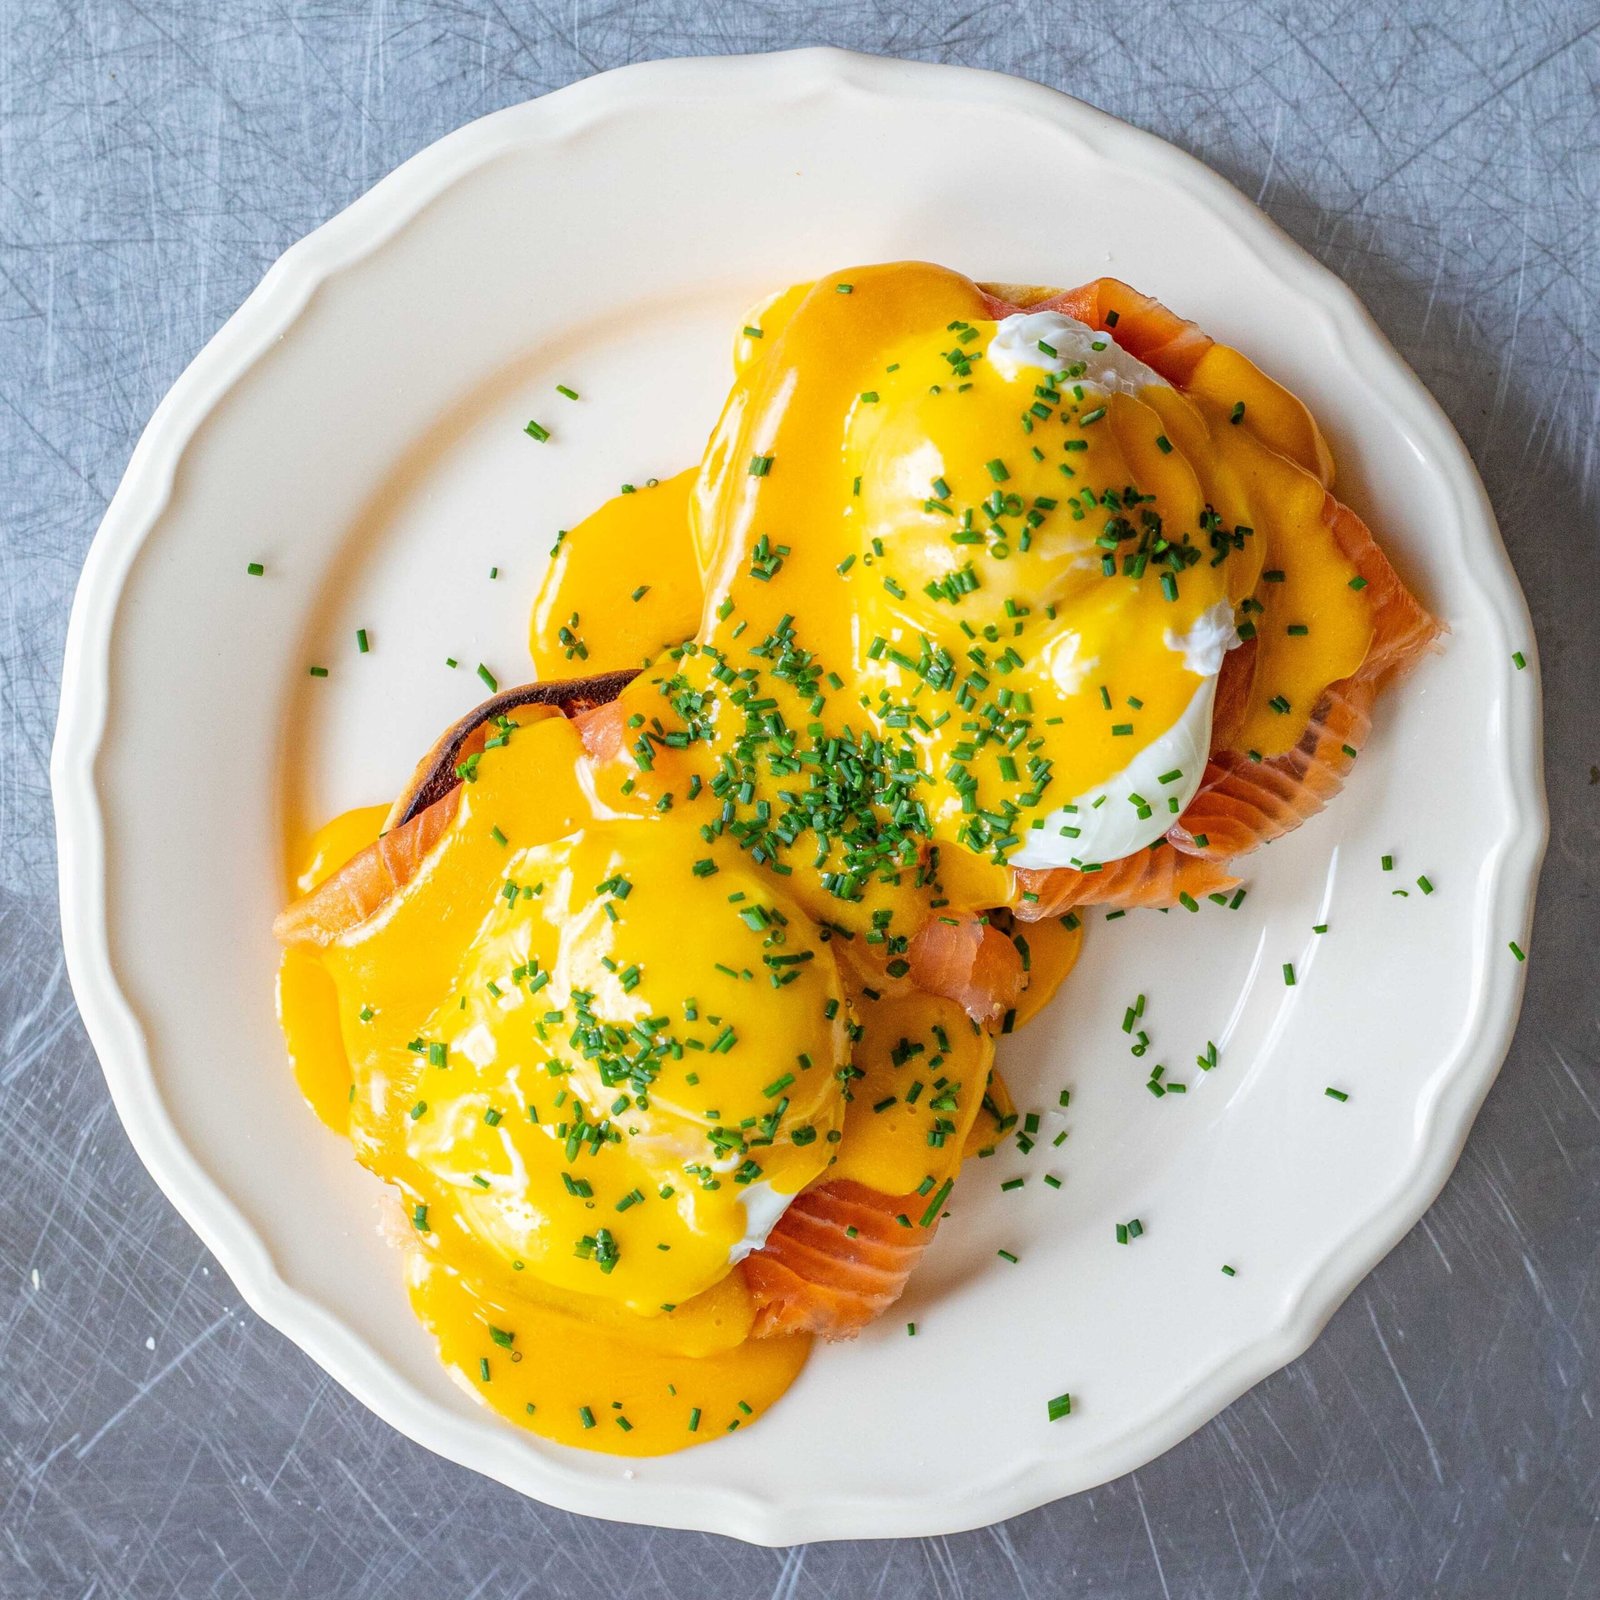
This is one of my favourite breakfast meals. It uses Hollandaise sauce, which is like hot, runny mayonnaise. It’s delicious and a great way to start the day. The sauce can be used with many other dishes and is easy to make with a few ingredients.
これは私のお気に入りの朝ごはんの一つです。オランデーズソースを使っていて、温かくてとろっとしたマヨネーズのようなソースです。とてもおいしくて、1日の始まりにぴったりです。このソースは他の料理にも使えて、少ない材料で簡単に作れます。
Benedict– Ham or crispy bacon 🥓
ハム または カリカリベーコン 🥓
Royale– Cold-smoked salmon 🐟 or salmon sashimi 🍣
スモークサーモン🐟 または サーモンの刺身🍣
Florentine– Cooked spinach 🌿
火を通したほうれん草🌿
Veggie– Grilled tomato 🍅, sliced avocado 🥑, sautéed mushrooms 🍄
グリルトマト🍅、スライスアボカド🥑、ソテーしたマッシュルーム🍄
Step 1: Make the Poached Eggs
Boil water in a pan, and reduce to a gentle simmer.
Crack an egg into a small bowl.
Stir the water in a circle (whirlpool), and gently slide the egg in.
Cook for 3–4 minutes. Remove with a spoon and drain.
Step 2: Choose Your Hollandaise Sauce
Option 1: Classic Butter Hollandaise
Ingredients:
2 egg yolks, 100g unsalted butter (melted), 1 tbsp lemon juice, Salt and pepper
Instructions:
In a bowl, whisk egg yolks and lemon juice.
Place the bowl over simmering water (double boiler).
Slowly whisk in melted butter, a little at a time.
Stir until thick and smooth.
Add salt, pepper, and serve warm.
Option 2: Low-Fat Yoghurt Hollandaise
Ingredients:
2 egg yolks, 100g low-fat Greek yogurt or low-fat crème fraîche, 1 tbsp lemon juice, Salt and pepper
Instructions:
Whisk egg yolks and lemon juice in a bowl.
Gently heat over simmering water, stirring until slightly thickened.
Remove from the heat and stir in yoghurt.
Season and serve warm.
Step 3: Assemble
Toast a slice of bread (English muffin or sourdough).
Add your chosen topping: ham, salmon, mushrooms, or avocado.
Place a poached egg on top.
Spoon your chosen Hollandaise sauce over the egg.
Sprinkle herbs like parsley or chives (optional).
🍳 エッグベネディクトの作り方
🥚 ステップ1:ポーチドエッグを作る
鍋でお湯を沸かし、弱火にします。
卵を小さいボウルに割ります。
お湯をスプーンでくるくる回して(うずを作る)、卵をそっと入れます。
3〜4分ゆでて、スプーンですくい、水を切ります。
🧈 ステップ2:オランデーズソースを選ぶ
🔹 オプション1:クラシック・バター・オランデーズ
材料:
卵黄2個、無塩バター100g(溶かす)、レモン汁 大さじ1、塩・こしょう
作り方:
ボウルに卵黄とレモン汁を入れて混ぜます。
鍋の上に置いた湯せんのボウルで温めながら混ぜます。
溶かしバターを少しずつ加えてよく混ぜます。
とろみが出たら、塩・こしょうを入れて完成です。
🔹 オプション2:低脂肪ヨーグルト・オランデーズ
材料:
卵黄2個、低脂肪ギリシャヨーグルト または クレームフレーシュ100g、レモン汁 大さじ1、塩・こしょう
作り方:
ボウルで卵黄とレモン汁を混ぜます。
湯せんで軽く温めながら混ぜ、とろみが出たら火を止めます。
ヨーグルトを加えてよく混ぜます。
塩・こしょうを入れて完成です。
🍞 ステップ3:仕上げ
パン(イングリッシュマフィン または サワードウ)をトーストします。
好みのトッピング(ハム、サーモン、マッシュルーム、アボカドなど)をのせます。
その上にポーチドエッグをのせます。
オランデーズソースをかけます。
お好みでパセリやチャイブをふりかけます。
スティッキー・ソーセージ、りんごとポテトのベイク
This is a classic side piece to a traditional British roast, it can also be used as a snack and with other foods, it’s very easy to modify and customise.
これは伝統的なイギリスのロースト料理に欠かせない定番の付け合わせです。軽食としても、他の料理と一緒にも楽しめ、とても簡単にアレンジやカスタマイズができます。
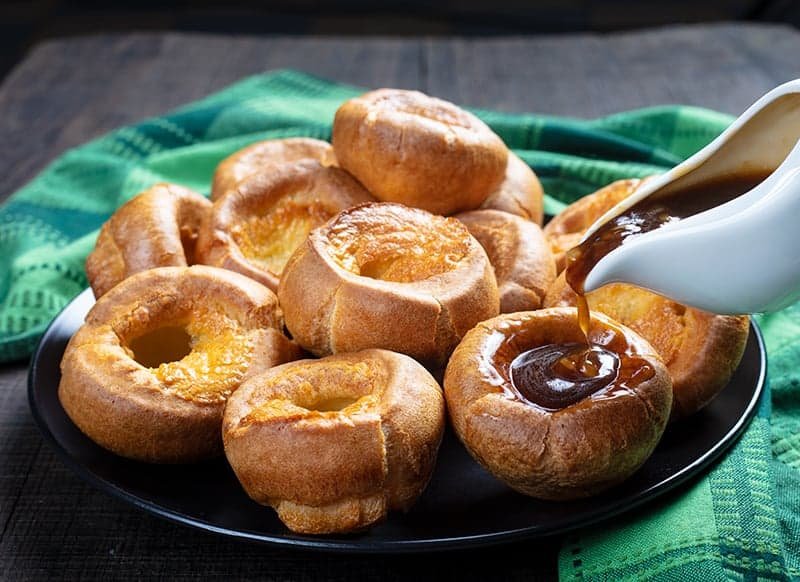
140g plain flour, 4 eggs, 200ml milk, Sunflower oil (for cooking), Salt and pepper (to taste)
Preheat Oven: Set your oven to 230°C (fan 210°C) or gas mark 8.
Prepare Tins: Drizzle a little sunflower oil evenly into two 4-hole Yorkshire pudding tins or two 12-hole non-stick muffin tins. Place them in the oven to heat through.
Make Batter: In a bowl, tip in the flour and beat in the eggs until smooth. Gradually add the milk, continuing to beat until the mixture is completely lump-free. Season with salt and pepper.
Pour Batter: Transfer the batter into a jug. Carefully remove the hot tins from the oven and evenly pour the batter into the holes.
Bake: Place the tins back in the oven and bake undisturbed for 20–25 minutes until the puddings have puffed up and browned.
Serve: Serve immediately. Once cooled, they can be frozen for up to 1 month.
材料:
薄力粉(プレーンフラワー) 140g, 卵 4個, 牛乳 200ml, サラダ油(ひまわり油など) 適量, 塩・こしょう 少々
作り方:
オーブンを予熱する:
230°C(ファン使用なら210°C)またはガスマーク8に設定します。
型の準備:
サラダ油を、ヨークシャープディング用の4ホール型2つ、またはマフィン型12ホール2つに少量ずつ均等に注ぎます。オーブンに入れてしっかり熱します。
生地を作る:
ボウルに薄力粉を入れ、卵を加えて滑らかになるまで混ぜます。次に牛乳を少しずつ加えながら、ダマがなくなるまでよく混ぜます。塩とこしょうで味を整えます。
生地を流し入れる:
生地を注ぎやすい容器に移し、熱した型をオーブンから取り出して、各ホールに均等に注ぎます。
焼く:
型をすぐにオーブンに戻し、20~25分間焼きます。プディングがふくらみ、きれいな焼き色がついたら完成です。
仕上げと保存:
焼きたてをすぐに提供してください。冷めた後は、最大1か月間冷凍保存も可能です。
スティッキー・ソーセージ、りんごとポテトのベイク
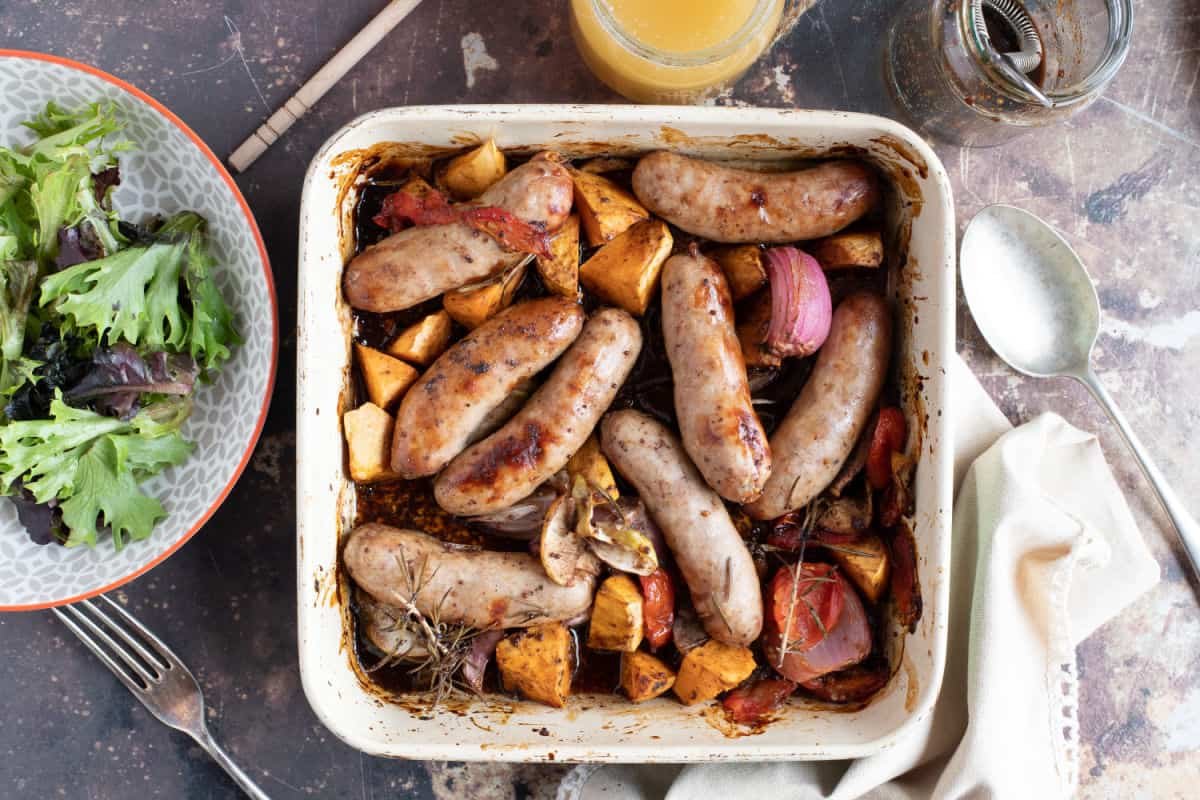
This is one of my favourite recipes to make, especially when combined with the onion marmalade, which gives a sweet, meaty flavour.
これは私の大好きなレシピの一つです。特に玉ねぎマーマレードと一緒に作ると、甘くてお肉のような味になります。
Ingredients:
8 pork sausages, 2 red onions, 2 eating apples, Optional 2 tablespoons of Onion marmalade (see past English boards), A few sprigs of fresh thyme, 2 tablespoons olive oil, 2 tablespoons clear honey, Salt and freshly ground black pepper
1. Preheat the oven to 200°C (fan 180°C) / 400°F / Gas Mark 6.
2. Prep the potatoes: Wash and halve the baby potatoes (no need to peel). Spread them across a large roasting tin. Let the potatoes cook until slightly for 2-3 minutes until slightly brown.
3. Add the sausages and veg: Add the sausages, red onion wedges, Optional onion marmalade (from a past English board recipe) and apple slices to the tin with the potatoes. Scatter over the thyme sprigs.
4. Season and coat: Drizzle the olive oil and honey evenly over everything. Season with salt and pepper. Toss well so everything is coated.
5. Bake: Place in the oven and roast for 35–40 minutes.
Halfway through cooking, turn the sausages and stir the ingredients so they brown evenly.
6. Check doneness: The sausages should be golden and cooked through, the potatoes tender, and the apples slightly caramelised.
7. Serve: Dish up while hot, spooning the sticky juices over the top.
Serve as-is or with a green salad on the side.
材料:
ポークソーセージ 8本, 赤たまねぎ 2個(くし形に切る), 食用りんご 2個(芯をとって、くし形に切る), ベビーポテト 500g(半分に切る), 玉ねぎマーマレード 大さじ2(オプション), フレッシュタイム 少々, オリーブオイル 大さじ2, はちみつ 大さじ2, 塩と黒こしょう 適量
作り方:
オーブンを予熱する 200°C(ファン付きなら180°C)に温めます。
ポテトを準備する: ベビーポテトを洗い、半分に切ります。天板に広げて、2〜3分焼き、少し焼き色をつけます。
ソーセージと野菜を追加する: ソーセージ、赤たまねぎ、りんご、オプションで玉ねぎマーマレードを天板に加えます。タイムを散らします。
調味料をかける: 全体にオリーブオイルとはちみつをかけ、塩・こしょうで味付けします。よく混ぜて全体をコーティングします。
オーブンで焼く: オーブンで35〜40分焼きます。 途中でソーセージを返し、全体を混ぜて焼き色を均一にします。
焼き具合を確認する: ソーセージはこんがり焼け、中まで火が通っているか確認します。 ポテトがやわらかくなり、りんごがキャラメル色になっていればOKです。
盛り付けとサーブ: 熱いうちにお皿に盛り、天板のソースをかけて食べます。そのままでも、グリーンサラダを添えても美味しいです。
簡単ハニーフラップジャック
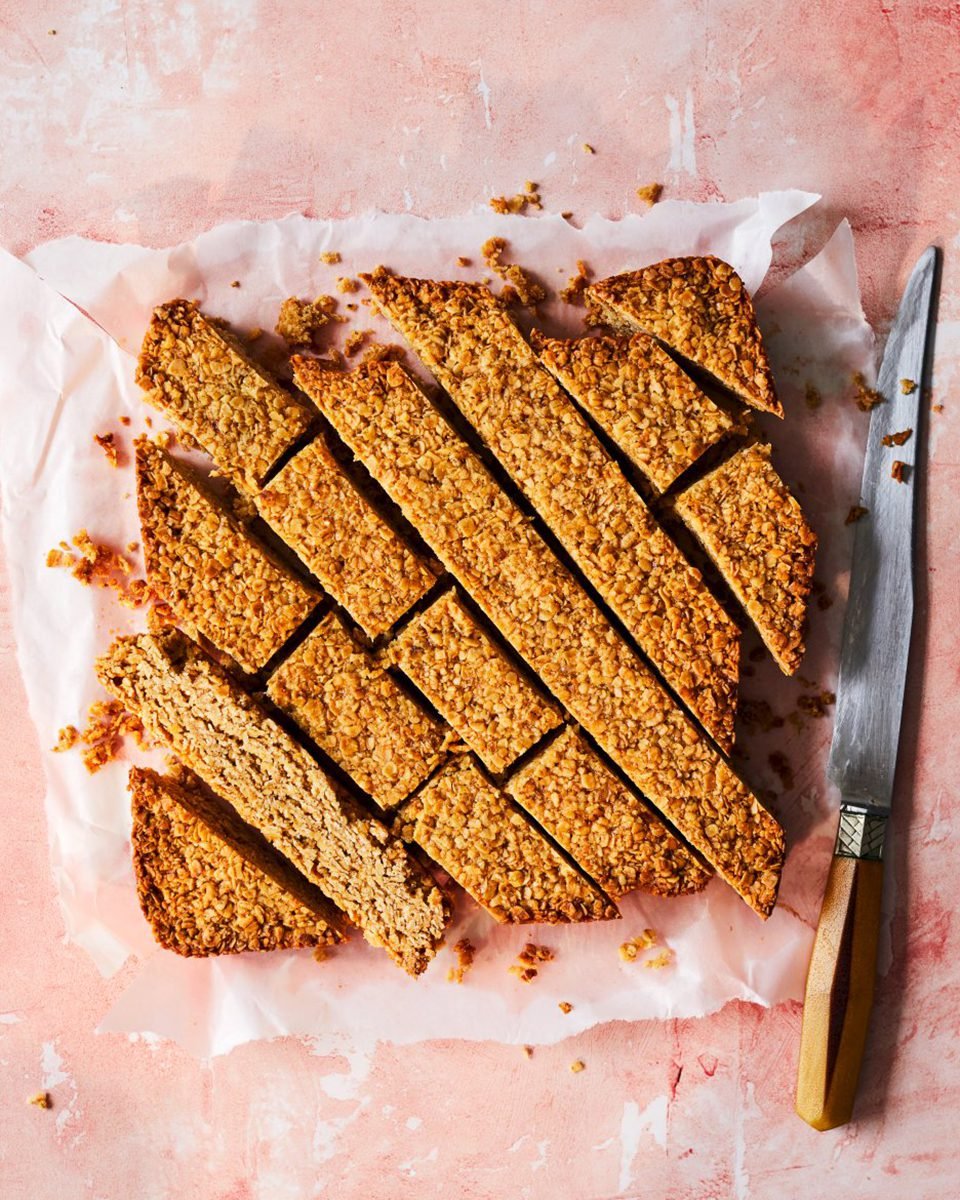
225g butter (plus extra for the tin)
50g caster sugar, 5 tbsp honey, 250g porridge oats
1. Heat the oven to 180C/160C fan/gas 4.
2. Butter and line a 30 x 15cm rectangle tin with baking parchment.
3. Melt the butter, sugar and honey in a pan over a medium heat, stirring frequently until the butter has melted and the mixture is smooth.
4. Put the oats in a mixing bowl, then pour over the butter and honey mixture.
5. Stir until all the oats are coated.
6. Tip into the prepared tin, and use a spatula or the back of a spoon to evenly spread out the mixture.
7. Cook for 10-15 mins until lightly golden.
8. Leave to cool in the tin, then remove before cutting into squares.
This is one of my easy treat to make if I’m seeing friends; it’s an indulgent treat that pleases everyone.
友達に会うときによく作る簡単なお菓子のひとつです。みんなが喜ぶ贅沢なスイーツです。
焼かないチョコレートタルト
This is one of my easy treat to make if I’m seeing friends; it’s an indulgent treat that pleases everyone.
友達に会うときによく作る簡単なお菓子のひとつです。みんなが喜ぶ贅沢なスイーツです。
200g pack all-butter biscuit, 100g butter, 1 tbsp golden syrup or honey, 100g bar dark chocolate, 100g bar milk chocolate, 1 tsp vanilla extract, 2 tbsp icing sugar, plus extra for dusting, 200ml whipping cream, 3 tbsp crème fraîche, to decorate, 200g raspberry to serve
Step 1
Crush the biscuits by putting them in a large, strong, plastic food bag and bashing with a rolling pin. Melt the butter with the syrup or honey in the microwave, then stir in the biscuits. Press onto the base and up the sides of a 12 x 36cm rectangular tin (or 23-25cm round flan tin) and chill while you make the filling.
Step 2
Break up the two chocolate bars and put in a large bowl. Melt in the microwave for 2-3 mins on Medium, stirring halfway through. Stir in the vanilla extract, then sift in the icing sugar. Whip the cream until it just holds its shape, then fold into the melted chocolate. Pour into the prepared tin and smooth the top. Chill for at least 2 hrs or for up to 2 days.
Step 3
Just before serving, remove the tart from the tin and slide it onto a flat plate (loosen edges first with the tip of a small pointed knife). You will find it easier to remove the tart if you leave it at room temperature for 30 mins. Put a few tsps of crème fraîche along the centre of the tart (or around the edges if the tart is circular) and top each with a raspberry, then dust lightly with icing sugar. Cut into thin slices and serve with extra raspberries on the side.
オールバターのビスケット(200g) 無塩バター(100g) ゴールデンシロップまたははちみつ(大さじ1) ダークチョコレート(100g) ミルクチョコレート(100g) バニラエキス(小さじ1) 粉砂糖(大さじ2)+仕上げ用に少々 ホイップクリーム(200ml) クレームフレッシュ(大さじ3) ラズベリー(200g)
作り方
-
ビスケットのクラストを作る: ビスケットを丈夫なビニール袋に入れ、麺棒で細かく砕きます。
-
バターとシロップを加える: バターとゴールデンシロップ(またははちみつ)を電子レンジで溶かし、砕いたビスケットに加えて混ぜます。
-
型に敷き詰める: 混ぜたビスケットを、12×36cmの長方形タルト型(または23〜25cmの丸型)に敷き詰め、底と側面をしっかりと押さえます。冷蔵庫で冷やして固めます。
-
チョコレートフィリングを作る: ダークチョコレートとミルクチョコレートを細かく刻み、ボウルに入れます。ホイップクリームを鍋で温め、沸騰直前で火を止め、チョコレートに注ぎます。チョコレートが溶けるまで混ぜ、バニラエキスと粉砂糖を加えてさらに混ぜます。
-
クラストにフィリングを流し入れる: 冷やしておいたクラストにチョコレートフィリングを流し入れ、表面を平らにします。冷蔵庫で少なくとも2時間、または完全に固まるまで冷やします。
-
仕上げる: 固まったタルトの上にクレームフレッシュをのせ、ラズベリーを飾ります。仕上げに粉砂糖をふりかけて完成です
フォカッチャ

This is one of my favourite things to make. Bread can be difficult if not done correctly, but it is very rewarding to make. Focaccia bread is delicious and can be customised with different topping options
これは私の大好きな料理の一つです。パン作りは、うまく作らないと難しいですが、うまくできるととても達成感があります。フォカッチャはとてもおいしく、いろいろなトッピングでアレンジできます。
500g strong bread flour, 7g yeast, 2 tsp fine sea salt, 5 tbsp olive oil (total), 350–400ml warm water, Fresh rosemary (a few sprigs), Cherry tomatoes (optional)
4. Mix until you have a slightly sticky dough.
6. Preheat your oven to 220°C (200°C fan) or gas mark 7.
8. Bake for 20 minutes until golden. While still hot, drizzle with 1–2 tablespoons of olive oil. Cut into squares and serve warm or cold.
強力粉 500グラム, ドライイースト 7グラム, 細かい塩 小さじ2, オリーブオイル 大さじ5, ぬるま湯 350〜400ml, フレッシュローズマリー 少々, ミニトマト(お好みで)
フレンチトースト(エッグブレッド)
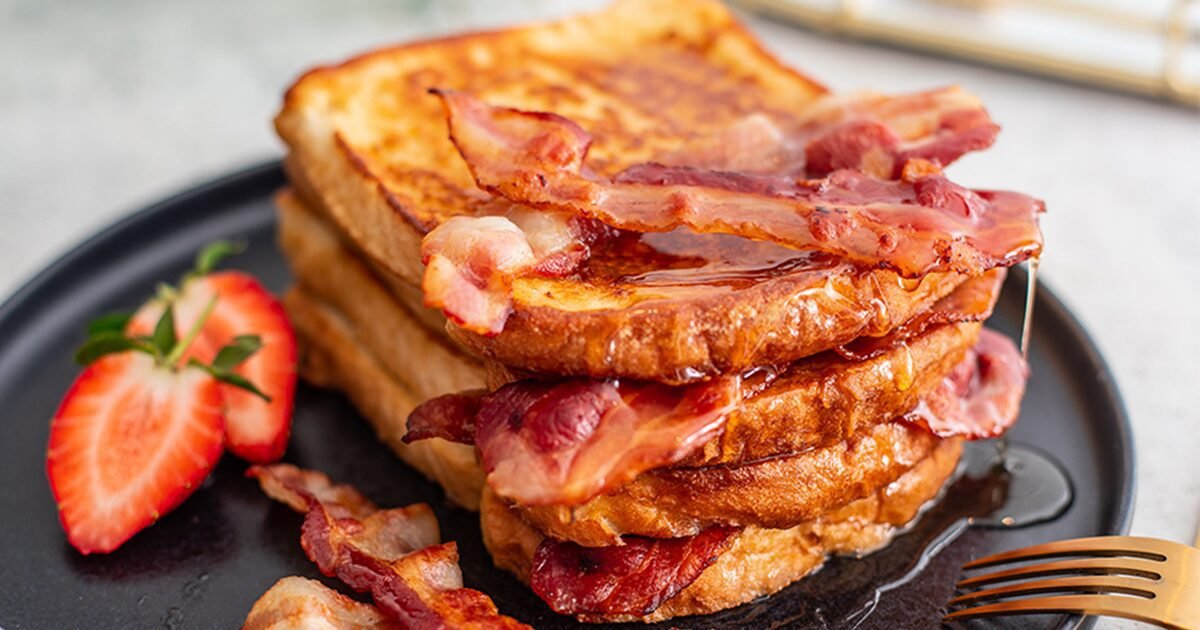
this recepie can be made to be either sweet or savoury, meaning it can be a great meal or snack. This is what I used to eat when I was little. It is known as a classic meal that’s easy on your stomach. It’s a very easy meal to make yourself and uses very few ingredients. It is also very easy to customise with different toppings and ways of cooking.
こちらのレシピは甘くも塩っぱくもできるので、食事にもおやつにもぴったりです。私が子どものころによく食べていた料理です。お腹に優しい定番の料理として知られています。材料も少なく、自分で簡単に作ることができます。また、トッピングや調理方法を変えることで、自由にアレンジするのも簡単です。
2 slices of bread, 2 eggs, 100 ml milk, (Optional) 1 tsp sugar, 1 tsp butter, (Optional) 1–2 slices of bacon
Optional toppings:
映画『シェフ』風キューバサンドイッチ(簡単バージョン)
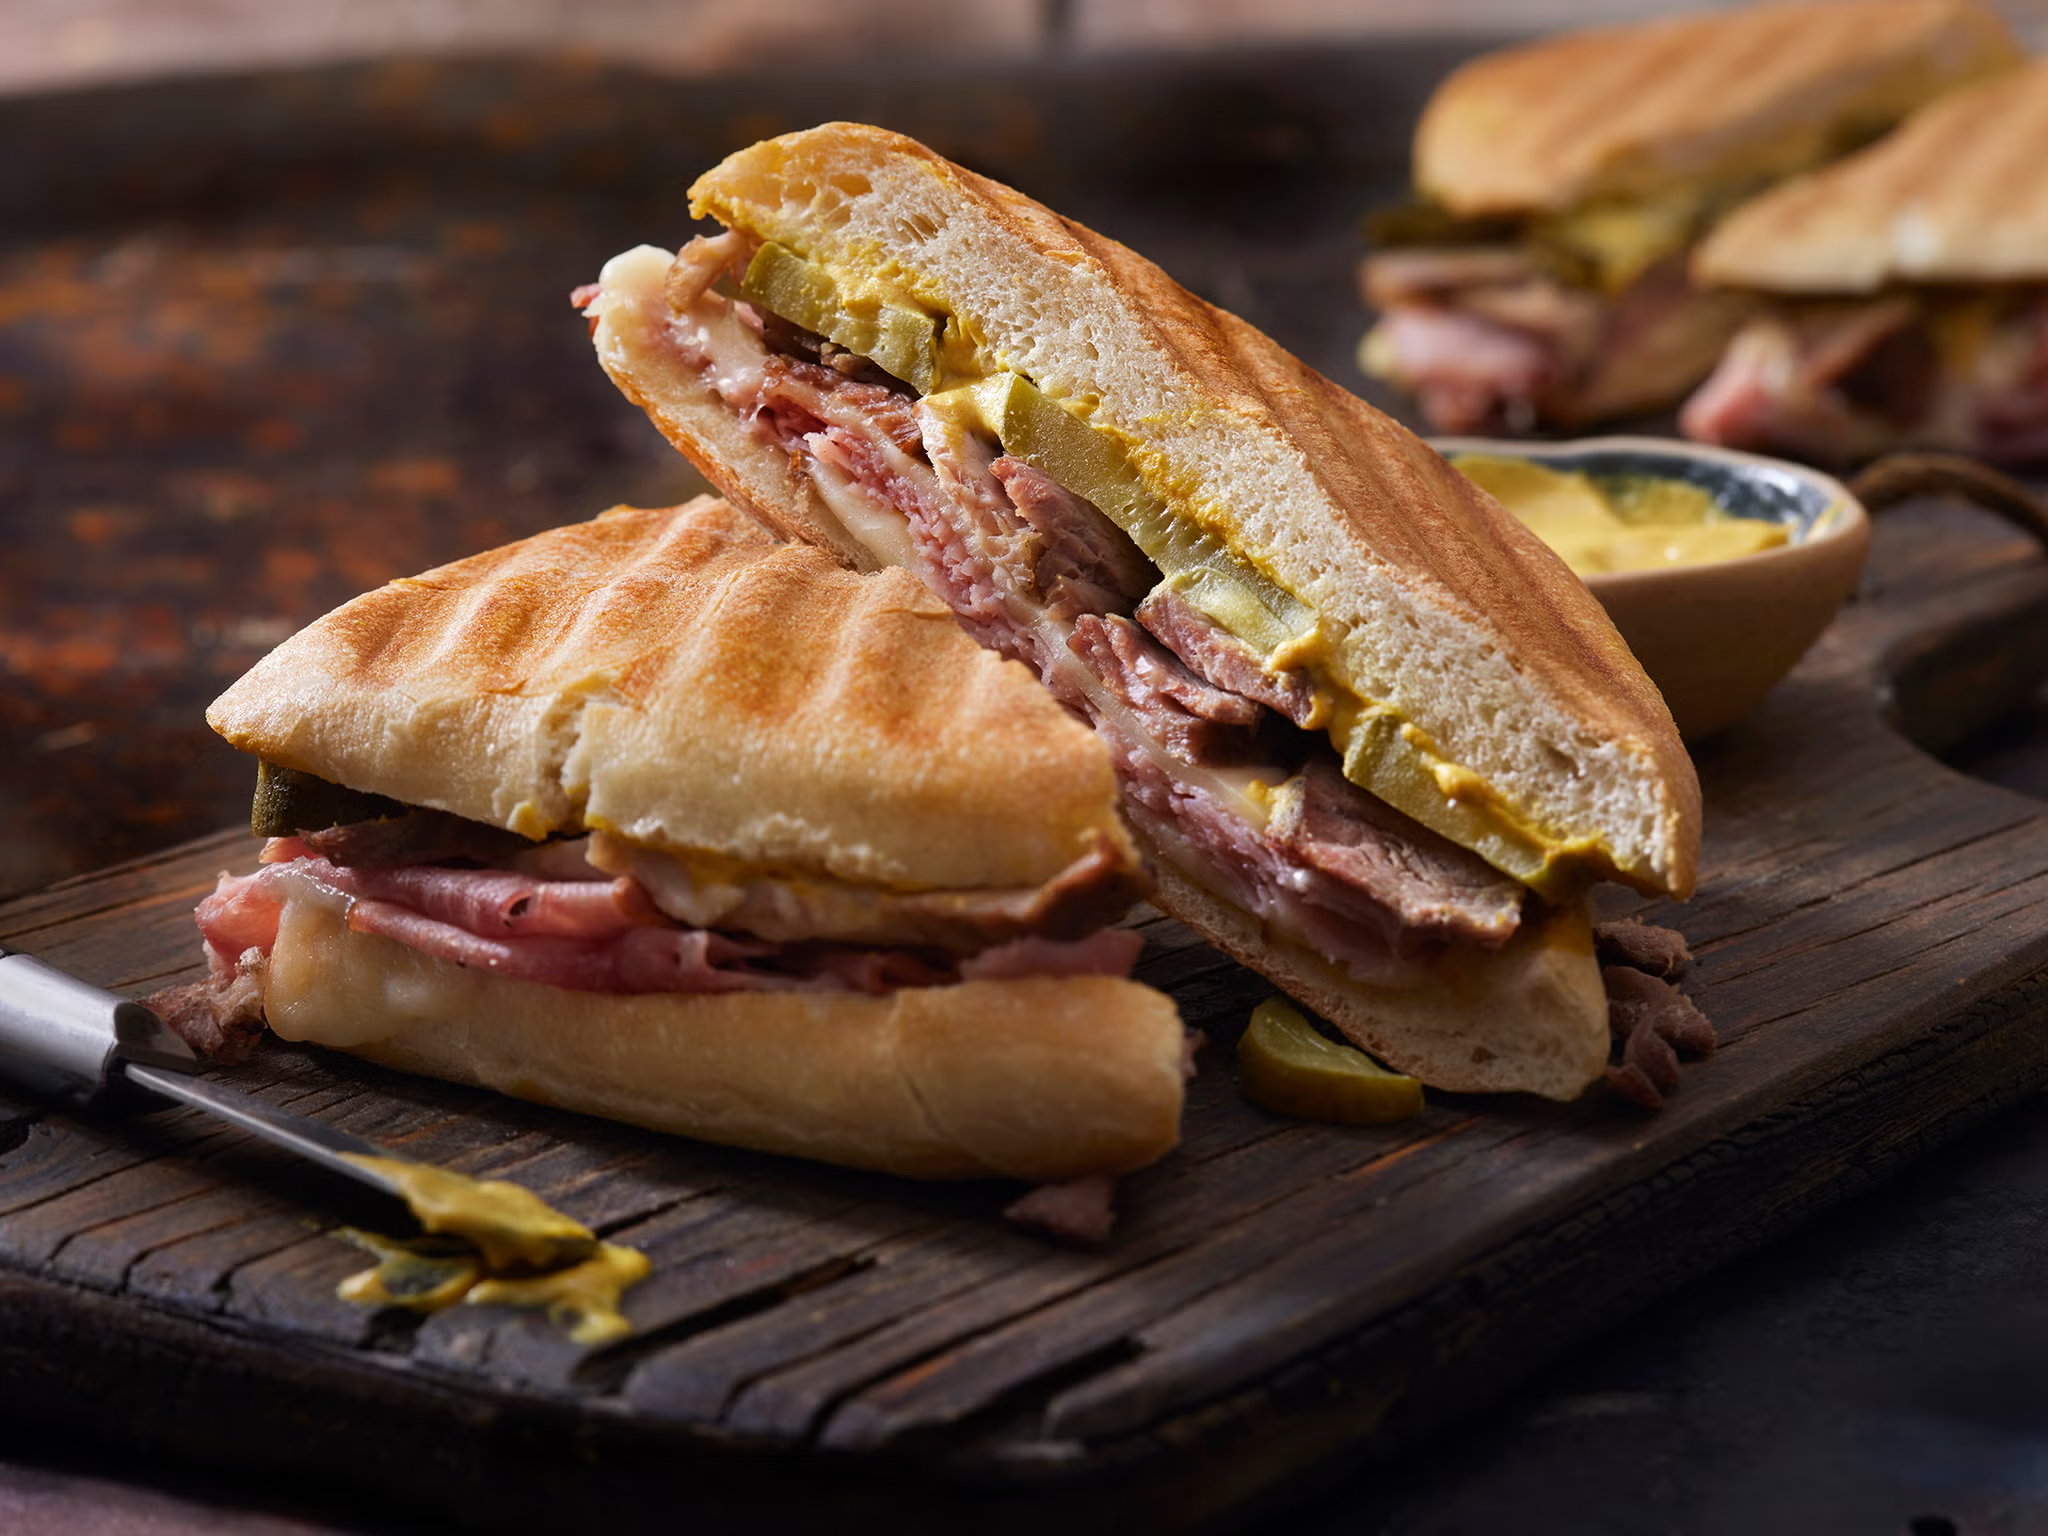
Following on from the film Chef from last week, this is a recipe for the Cuban Sandwiches shown in the film.
先週見た映画『シェフ』に続いて、今回は映画に出てきたキューバサンドのレシピです。
Bread (2 slices, or panini-style bread if available), Ham, Cheese, Pickles (sliced), Mustard, Butter, Roast pork (pre-cooked or leftover pork cutlet)
1. Spread mustard on one side of both slices of bread.
2. Layer ham, cheese, pickles, and pork between the slices.
3. Butter the outside of the bread.
4. Toast in a frying pan or sandwich press until golden and the cheese is melted.
5. Press with a spatula to flatten the sandwich as it cooks.
6. Cut and serve warm.
– 食パン2枚, – ハム, – とろけるチーズ, – ピクルス(スライス), – マスタード, – バター, – 焼き豚やトンカツの残り.
1. 食パンの片面にマスタードをぬります。
2. ハム、チーズ、ピクルスをはさみます。焼き豚があれば入れても美味しい!
3. パンの外側にバターをぬります。
4. フライパンやホットサンドメーカーでチーズがとけるまで焼きます。
5. フライ返しでパンをおさえて、平らにします。
6. 半分に切って、あたたかいうちに食べましょう!
トード・イン・ザ・ホール
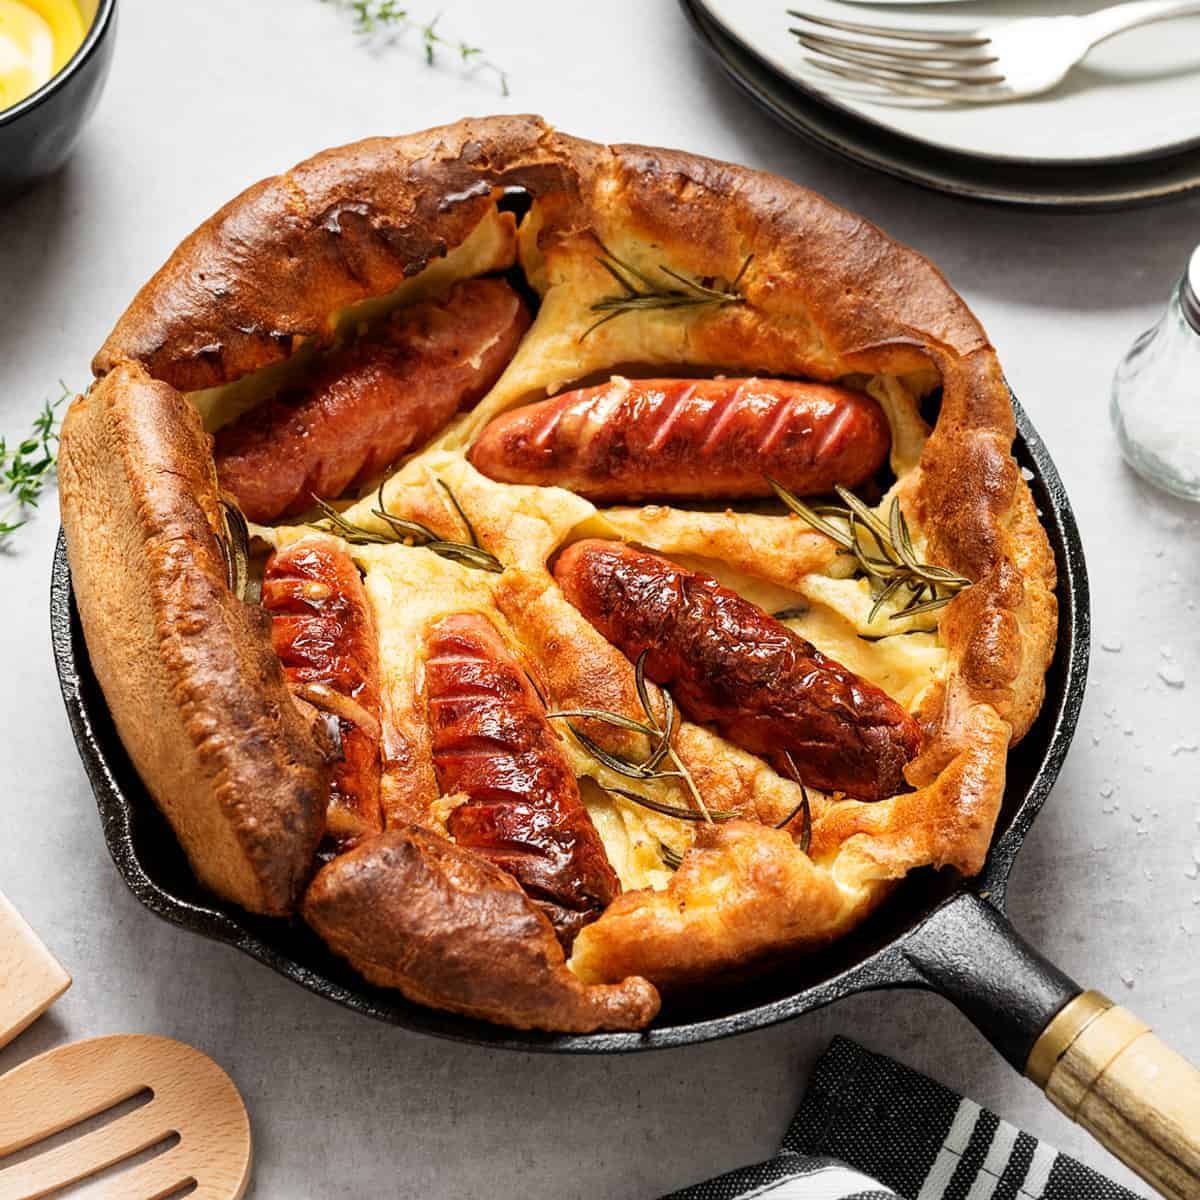
This makes enough for the whole family. This uses a traditional British Yorkshire pudding to complement the sausages.
これは家族全員で食べられる分量です。イギリスの伝統的なヨークシャープディングを使って、ソーセージによく合う料理になっています。
8 sausages, 140g plain flour, 4 eggs, 200ml milk
1. Preheat the oven to 220°C
2. Put the sausages in a baking dish and drizzle with oil.
3. Cook the sausages for 10 minutes.
4. Make the batter:
Mix the flour, eggs, milk, and salt in a bowl.
5. Carefully pour the batter over the hot sausages.
6. Bake for 20–25 minutes until puffed up and golden.
Serving idea:
Serve with gravy or tomato sauce and vegetables!
ソーセージ8本, 140g 小麦粉, 卵4個, 牛乳200ml
- オーブンを220°Cに予熱します。
- ソーセージを耐熱皿に入れて、油をかけます。
- オーブンで10分ほど焼きます。
- 生地を作ります:ボウルに小麦粉、卵、牛乳、塩を入れて混ぜます。
- 焼けたソーセージの上に、生地をゆっくり流します。
- 生地がふくらんで、きつね色になるまで20〜25分焼きます。
おすすめの食べ方:
グレイビーソースと野菜と一緒に食べるのがおすすめ!
バルサミコオニオンマーマレード
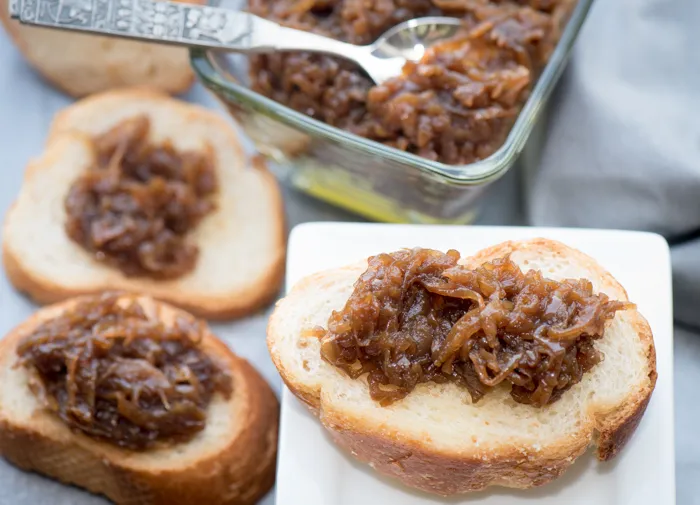
This can be eaten with toast/bread and crackers or can be used with cooking such as omelettes, hamburgers, salads, tray bakes, and much more.
これはトーストやパン、クラッカーと一緒に食べられます。また、オムレツ、ハンバーガー、サラダ、トレイベイクなど、料理にも使えます。
1kg onions, 100g brown sugar, 150ml balsamic vinegar
Instructions:
• Heat oil or butter in a large pan over low heat.
• Add sliced onions and cook slowly, about 20–30 minutes, stirring occasionally, until soft.
• Add brown sugar over the onions and stir well.
• Pour in balsamic vinegar, red wine vinegar, and honey (if using).
• Let the mixture cook on low heat for another 20–30 minutes, stirring occasionally, until thick and sticky.
• If it gets too dry, add a small amount of water.
•After 20–30 minutes, remove from the heat to cool slightly.
•Spoon into clean jars and store in the fridge for up to 2 weeks.
1kg 玉ねぎ, 100g ブラウンシュガー, 150ml バルサミコ酢
•フライパンに油またはバターを入れて、弱火で温めます。
•スライスした玉ねぎを加え、20〜30分ゆっくり炒めます。ときどき混ぜながら、やわらかくなるまで炒めます。
•玉ねぎにブラウンシュガーを加えて、よく混ぜます。
•バルサミコ酢、赤ワインビネガー、はちみつ(使う場合)を加えます。
•弱火でさらに20〜30分煮ます。ときどき混ぜてください。
•水分が少なくなったら、水を少し加えてください。
•20〜30分後、火を止めて少し冷まします。
•清潔なビンに入れて、冷蔵庫で2週間まで保存できます。
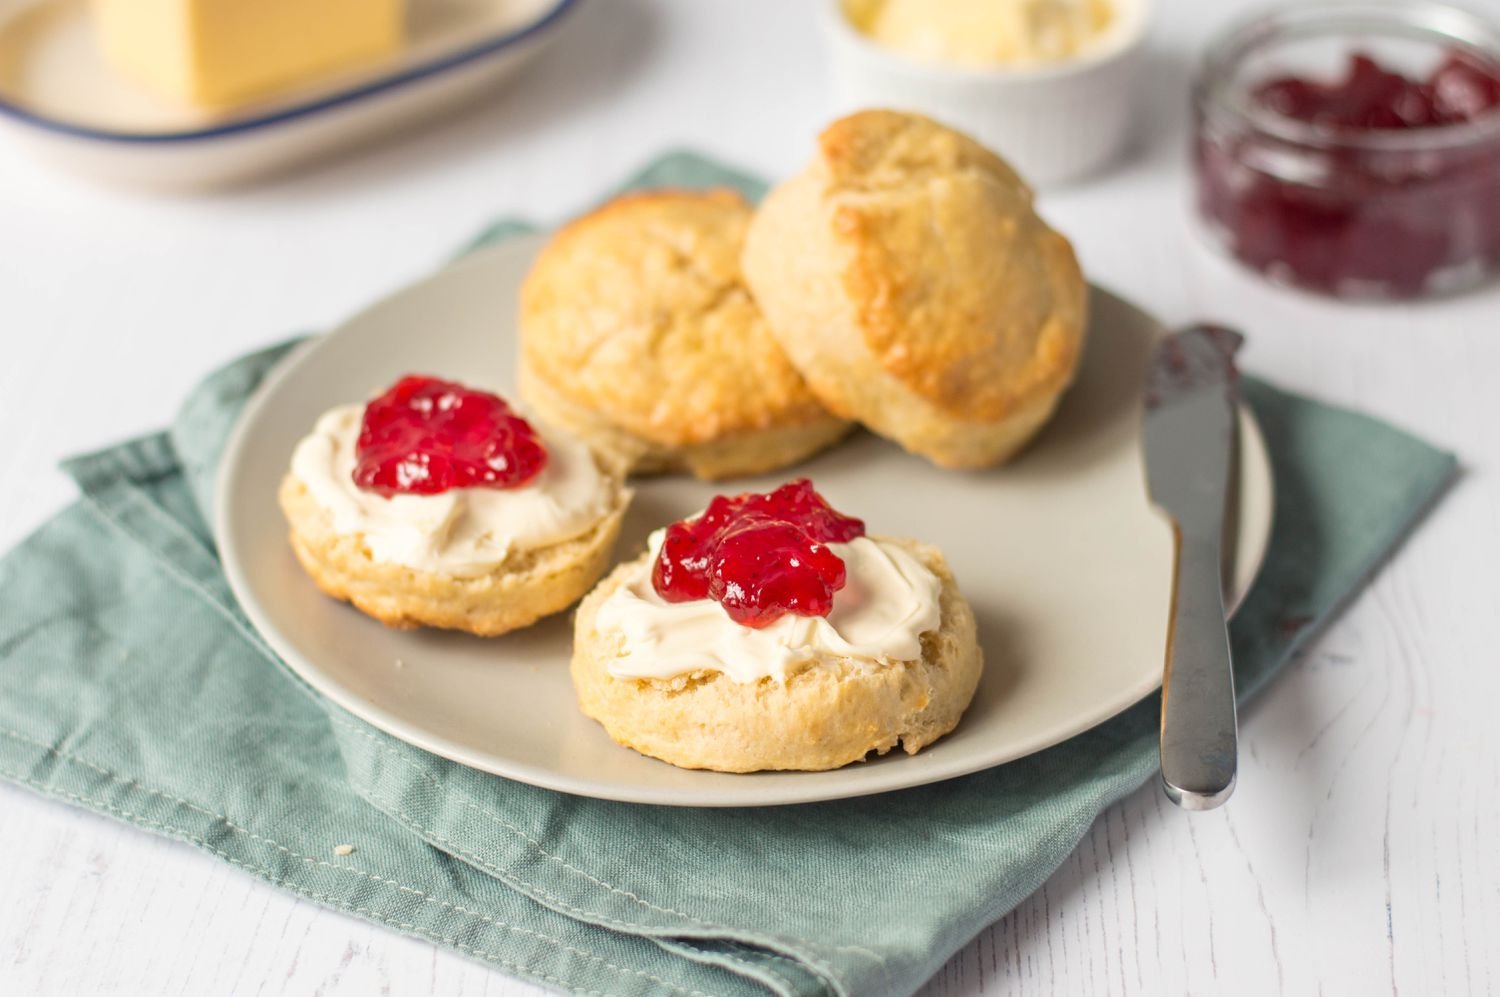
225g flour, 55g butter, 25g sugar, 150ml milk, 1-t spoon baking powder
Preheat oven to 220°C.
Rub the butter into the flour.
Add 1-T spoon of baking powder
Stir in sugar and milk to form dough.
Roll out and cut into round circles
bake for 12-15 minutes.
Enjoy
小麦粉225グラム、バター55グラム、砂糖25グラム、牛乳150ミリリットル、ベーキングパウダー小さじ1。
オーブンを220℃に予熱します。
バターを小麦粉にすりこみます。
ベーキングパウダー大さじ1を入れます。
砂糖と牛乳を入れて、生地を作ります。
生地をのばして、丸く切ります。
12〜15分焼きます。
できあがり!